-
Notifications
You must be signed in to change notification settings - Fork 30
Getting started with the VirtualPC activity
The VirtualPC activity can be used to control the Microsoft VirtualPCs hosted on the build agent machine. It should be compatible with the Window7 VirtualPC and the legacy VirtualPC 2007. In this example we aim to show the the basic steps that are required to get the activity integrated into a build. It should be noted that this is one of the more complex activities to get working as there are issues with COM activation and making sure VirtualPC commands run to completion before the next command is sent
Before you can make use of any of the TFS community build activities you have to make sure they are available for the build system and on your development PC. Instructions for this process can be found in the ALM Rangers build guide or in the getting started page of this wiki. This page assumes the VirtualPC is available in the developers build process workflow toolbox and that the Microsoft.VirtualPC.Interop.dll, TfsBuildExtensions.Activities.dll and TfsBuildExtensions.Activities.VirtualPC.dll are in your build systems CustomAssemblies folder (all these can be found in the community build activities distribution).
Download and install the required version of VirtualPC
Follow the documentation provided with VirtualPC to create a VM for use with the build. This can be any operating system support by VirtualPC.
Getting this activity to work can be a little complex. This is because it uses COM for communication and this has a lot of security options, many of which cannot be used on default settings. This page tries to give an outline of the steps required to get started, we do not claim this list is exhaustive or that there may be easier ways to configure some settings.
If you run a build workflow (as described below) without altering the COM security you will see an error in the build log
Retrieving the COM class factory for component with CLSID {9A1774B7-8251-4468-A214-61DCAED9AC2F} failed due to the following error: 80070005 Access is denied. (Exception from HRESULT: 0x80070005 (E_ACCESSDENIED)).
This can also be found in the System event log
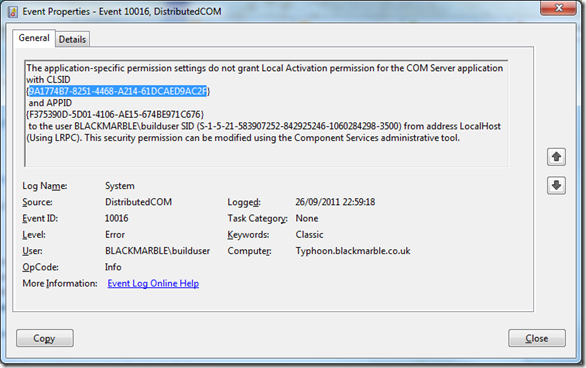
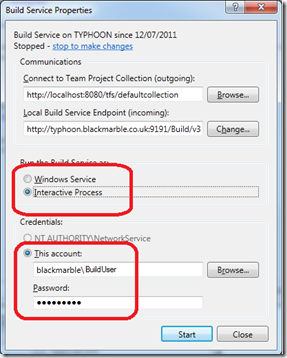
The first step is that the build process must be running as an interactive session, and it must also be running as the currently logged in user i.e. the build is on the current running desktop.
The identity of the build process is set in the Team Foundation Server Admin Console, in the build configuration section.
Stop the running build service and set the properties as shown below, where BuildUser will be logged in use on the build box (the box running the build agent)
Now you need to make sure the COM activation settings are correct
- Login on the build agent PC (where VirtualPC is also installed)
- Run regedit (remember to run as administrator)
- Find the key HKEY_CLASSES_ROOT\AppID{f375390d-5d01-4106-ae15-674be971c676} (you can see this as being the problem APPID from the event log entry. If you try look for the CLSID from the event log you will just waste a lot of time, it is APPID that is important)
- Right click and select permissions.
- Select advanced
- Make sure the owner is NOT the trusted installer, but a local administrator (or the administrators group)
- Exit regedit
- Run Dcomcnfg (remember to run as administrator)
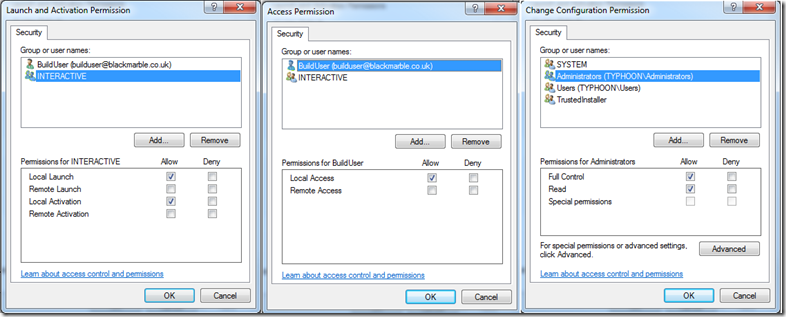
- In Computer, My Computer, DCOM Config find the VirtualPC node. Right Click and select properties. Note the APPID is {f375390d-5d01-4106-ae15-674be971c676} to confirm you are in the right place
- Select security and using the edit buttons make sure the interactive user has rights for local launch, local activation, local access as shown below. (Note: if the buttons are greyed out on the security tab it is because the user running dcomcnfg is either not an administrator or is not the owner of the APPID, see steps above to fix this)
To make the build process reusable it is a good idea to pass the name of VirtualPC into the build as an argument. In this sample it is passed in as TestVM which is defaulted to the string “TestVM”. This is the name of the VPC on the build agent.

The workflow can now be build by adding one or more VirtualPC activities. I added the following steps at the end of default build process template, but there is reason that this activity cannot be used at any point in a build. My aim was to start a VM, run notepad, take a screenshot and shut the VM down.
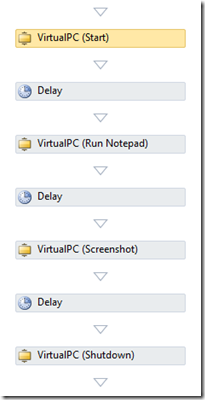
The first step is to start the VM. The settings are shown below, the key ones are the Action and the VMName. Note that to make the build log clearer I also set the DisplayName.
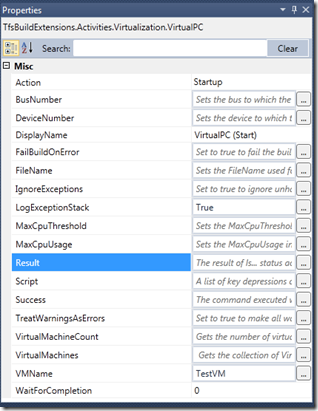
It is at this point that some confusion can occur, as this activity should return instantly with a “Success” result. This does not mean the VM has started, but just that the command was issued without error. You might think setting the WaitForCompletion property (-1 for wait forever or a time in milliseconds) would help, but it does not. This property is only used for disk merge related actions.
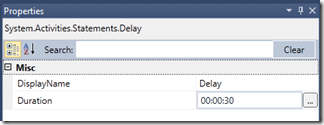
As it is no use issuing more VM commands until the VM is running it is best at this point to issue a workflow delay of enough time to allow the command to complete. This is done using the WF4 standard Delay activity
You can now issue the next command, in this case to run a script. The script could be passed as a build argument, in this sample it is hard coded. Care has to be taken here as scripts are just sendkeys commands and these are sensitive to VM performance, key strokes can easily be lost. Some experimentation will be required to get the delays right.
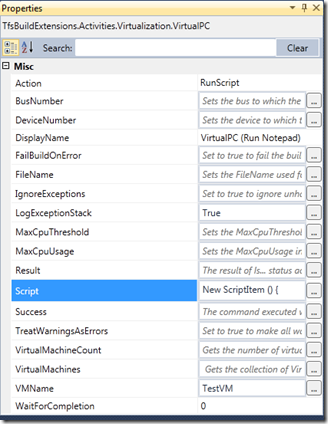
the Script property was set to
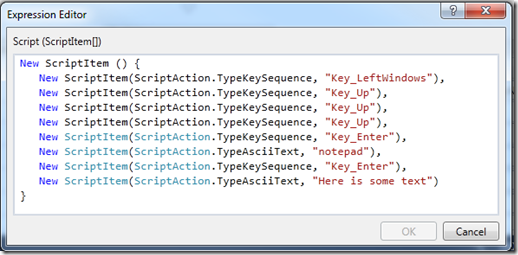
Next another 30 second delay (probably not really required to be this long, but better to be safe) and then take a thumbnail screen shot is taken and store it in the drops location.
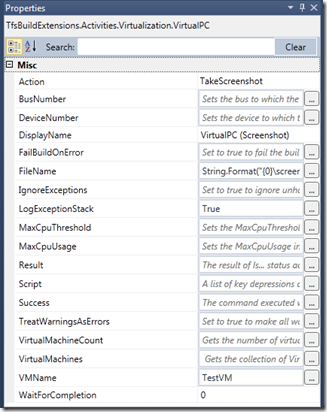
Make sure the FileName you specify is valid e.g.
String.Format("{0}\screenshot.bmp",BuildDetail.DropLocation)
If it is not then you will get an error such as
Error: A generic error occurred in GDI+.. Stack Trace: at System.Drawing.Image.Save(String filename, ImageCodecInfo encoder, EncoderParameters encoderParams) at TfsBuildExtensions.Activities.Virtualization.VirtualPC.TakeScreenshot() at TfsBuildExtensions.Activities.Virtualization.VirtualPC.InternalExecute() at TfsBuildExtensions.Activities.BaseCodeActivity.Execute(CodeActivityContext context).
Again another delay (again probably longer than needed) and finally shut the VM down
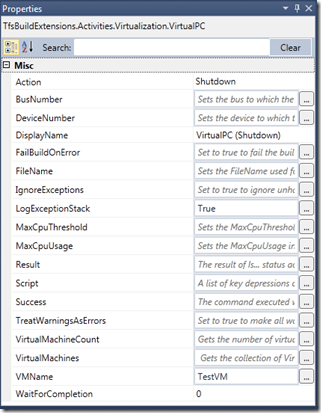
Remember this is a simple example, but you also have options to manage snapshots via this activity.
When you run the build you should see entries as follows in the build log
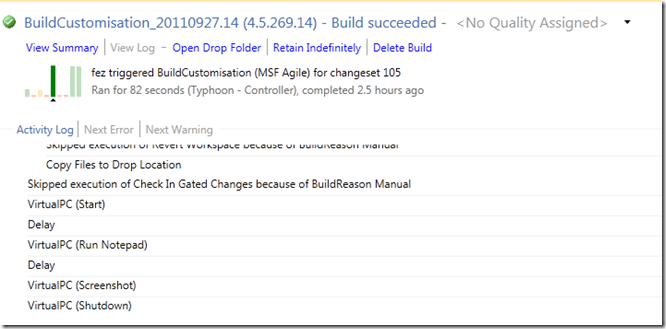
And a 64x48 thumbnail in the drops folder
