-
Notifications
You must be signed in to change notification settings - Fork 30
Getting started with the CatNetScan activity
[New for Release 1.3.0.0]
The CAT.NET activity can be used to run the CATNetCmd.exe tool to check for security issues in an assembly. For more details on this tool see the MSDN Security Tools blog. In this example we aim to show the basic steps that are required to get the activity integrated into a build.
Whether this activity is still that useful is an interesting question as much of its functionality has moved into the Code Analysis built into Visual Studio
Before you can make use of any of the TFS 2010 community build activities you have to make sure they are available for the build system and on your development PC. Instructions for this process can be found in the ALM Rangers build guide or in the getting started page of this wiki. This page assumes the CatNetScan activity is available in the developers build process workflow toolbox.
The 2.0 CTP of Cat.NET can be downloaded from Microsoft Connect
One of these versions needs to be installed on the build agent PC, it should not matter which.
Add the activity to the workflow
The CatNetScan activity should added to the workflow. As the tool works with compiled assemblies it is probably best to place it just after the build workflows Compile and Tests block.

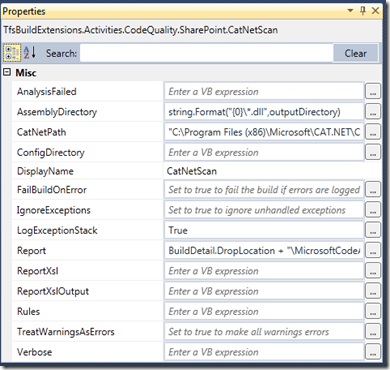
The following properties need to be set (as a minimum)

- AssemblyDirectory (Required) – this is a comma separated list of assemblies to test. Wild cards can be used. A good starting option is to use string.format(“{0}*.dll”, outputDirectory).
- Report (Required) – this is the XML file to dump the analysis results in. This is set as required as it is used by the activity to set return values and build messages based on the analysis results. A good default is BuildDetail.DropLocation + "\Cat.NETReport.xml" as this places the report file in the build drop location ReportXSlOutput (If missed out you get no HTML report) – this is the nicely formatted analysis results. By default the report.xstl in the Cat.NEt program folder will be used for the transform. A good default is BuildDetail.DropLocation + "\Cat.NETReport.htm" as this places the report file in the build drop location
- Catnetpath The activity will try to look for the command line exe in it’s default location. If this fails a hard coded path can be entered in this property e.g. "C:\Program Files\Microsoft\CAT.NET\CATNetCmd.exe" Note: You can rename the CATNETCMDx64.exe to remove the X64 is it can be found by default , thus removing the need to set this arguement The other properties of the activity match the command line arguments of the Cat.NET tools. For more details run CatNETCMD.EXE /?
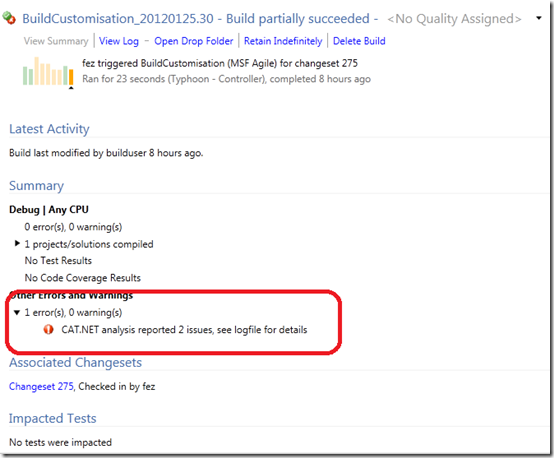
When the build is run, and if a CAT.NET violation is found, such as a SQL Injection or XSS issue, then the build will fail and the number of issues will be listed in the build report summary. The details of the issues will be found in the XML and HTML report files in the drops location (if using the setting above)
The activity also returns an out bool parameter AnalysisFailed to indicated if any issues were found, which can be used in the build workflow.
