-
Notifications
You must be signed in to change notification settings - Fork 30
Getting started with the CodeMetric and CodeMetricHistory activity
The CodeMetric activity can be used to run the CodeMetric PowerTools and publish its results to TFS. In this example we aim to show the basic steps that are required to get the activity integrated into a build.
Before you can make use of any of the TFS 2010 community build activities you have to make sure they are available for the build system and on your development PC. Instructions for this process can be found in the ALM Rangers build guide or in the getting started page of this wiki. This page assumes the CodeMetric activity is available in the developers build process workflow toolbox.
Download Code Metrics Command Power Tool and install it onto the PC running the TFS Build Agent. This will place the metric.exe in the C:\Program Files (x86)\Microsoft Visual Studio 10.0\Team Tools\Static Analysis Tools\FxCop\ folder.
We need a project that will show issues when scanned with the code metrics tool. Create a new ClassLibrary project, add a reference to nUnit (can do this via NuGet or manually). Add a single test to the class library, this will cause the nUnit assemblies to be built with the ClassLibrary and copied to the drops location. The nUnit assembly is complex enough to show issues when scanned with the CodeMetrics.
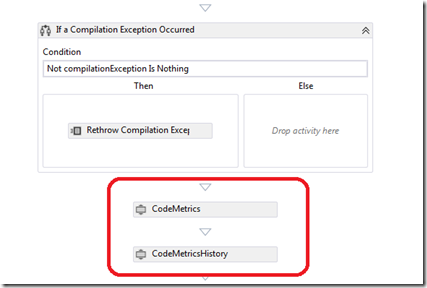
The CodeMetric activity can be added to the workflow. As the tool works with compiled assemblies it is probably best to place it just after the build workflows Compile and Tests block.
As well as the CodeMetric activity there is also the associated CodeMetricHistory activity, this is used to manage your archive of CodeActivity metrics logs. This also can optionally be added to the workflow.

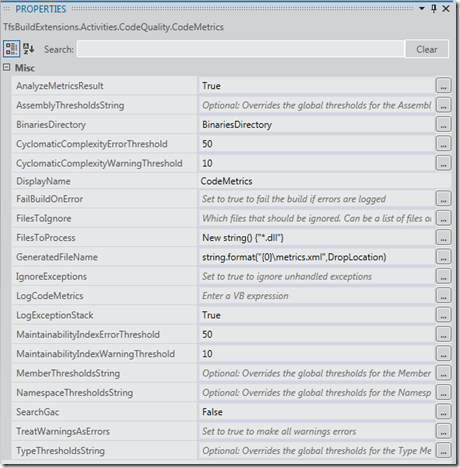
The following properties need to be set for the CodeMetrics activity

The entries shown above are minimum properties required
- BinariesDirectory – the directory to scan for the assemblies to run CodeMetrics on e.g. BinariesDirectory
- CyclomaticComplexityErrorThresholds - must be set to some value. e.g. 50
- CyclomaticComplexityWarningThresholds - must be set to some value. e.g. 10
- MaintainabilityIndexErrorThresholds - must be set to some value. e.g. 50
- MaintainabilityIndexWarningThresholds - must be set to some value. e.g. 10
For sensible threshold settings you will need to experiment for your code base, check the CodeMetric post for more information
If these five are not set you will see errors in the form
_TF215097: An error occurred while initializing a build for build definition \MSF Agile\BuildCustomisation: The build process failed validation. Details: Validation Error: The private implementation of activity '1: DynamicActivity' has the following validation error: Value for a required activity argument 'BinariesDirectory' was not supplied. _
As well as the compulsory properties there a couple more you need to set. These set values that the metric.exe command line will default, but need to be set for a TFS build
-
GeneratedFileName – this properties help text says it is optional, but if not set it seems that the logic that is meant to parses the results file cannot find it. To avoid this issue set this property so that the file is created in the OutputDirectory using string.format("{0}\Metrics.xml",outputDirectory). This has the added advantage that the metric.xml results file is also automatically copied to the build drop location
-
FilesToProcess – you should be able to leave this blank and Codemetric will check all .EXE and .DLL files in the target folder. However, if not .EXE file is found you get a
_ error : CA0055 : Could not load file: 'C:\Builds\1\MSF Agile\BuildCustomisation\Binaries*.exe'. _
This might not be an issue for your project, but to avoid this potential problem specify the list of filenames (with wildcards) in the form new string() {“*.dll”}. Alternatively using the standard TFS build FindMatchingFiles activity could be used to build the list (see nUnit activity documentation for this technique)
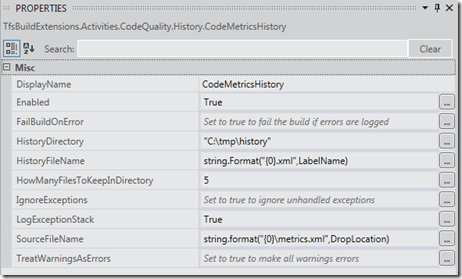
If all you want is to do is put the code metric data in the drops location, this is enough. However the CodeMetricHistory activity allows you to keep a fixed number of CodeMetric results in a central location. The properties on the CodeMetricHistory activity to do this are

- HistoryDirectory – The centralised store location e.g. c:\tmp\history
- HistoryFileName – A unique name for each log file e.g. string.Format(“{0}.xml,LabelName) where LabelName is the build name
- HowManyFilesToKeepInDirectory – as the name implies the max number of files before the oldest is deleted
- SourceFileName – The source for the log file e.g. string.format("{0}\Metrics.xml",outputDirectory). Note that this could be passed as a build variable form the previous activity
Note: I can see not reason why the CodeMetricHistory activity could not be used for any archiving purpose of a similar nature, it does nothing that is CodeMetric specific
The build output should be similar to that shown below

The Metric.XML file is also available for further processing in the builds drop folder.