-
Notifications
You must be signed in to change notification settings - Fork 6
Custom Moduls
Before we start please download the deobfuscated Ballance nmo files from this repository. They would be very useful in the following tutorial.
Also the Built-in Mods are valuable references.
To create a new ball type, you firstly need a model for the ball, as well as ball pieces for transforming. You can create the models with 3ds max, or use the same model as existing balls.
-
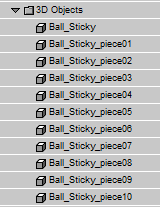
First you should get your ball a name. For example in one of the built-in mods, there is a new ball type called Sticky. Rename your ball and ball pieces as following:

-
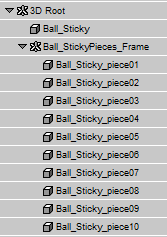
Create a 3D Frame named Ball_StickyPieces_Frame, place it at (0, 0, 0), and set all ball pieces objects as its children in Hierarchy Manager:

-
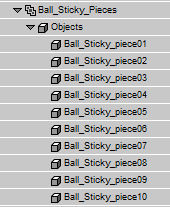
Create a group named Ball_Sticky_Pieces, and add all ball pieces objects into it:

-
Create a group named All_Ball_Sticky and add all other objects: 3D Entities, Materials, Meshes, Textures, and the Ball_Sticky_Pieces Group into it.
-
Create two scripts under All_Ball_Sticky Group: Ball_Explosion_Sticky and Ball_ResetPieces_Sticky. These two scripts will create ball pieces when transforming, and play the ball pieces disappearing animation. Generally:
- Ball_Explosion_Sticky set the position of Ball_StickyPieces_Frame to Ball_Pos_Frame, set ball pieces visible, and physicalize all ball pieces.
- Ball_ResetPieces_Sticky modify the transparency of ball pieces materials to make them disappear gradually, unphysicalize all ball pieces and restore IC of these objects.
-
You can directly copy these scripts from Balls.nmo, or write them on your own. Remember to update the objects used in the scripts if copying is your choice.
-
Finally, hide all the 3D Frames, 3D Objects and Groups, and set the IC state of All those 3D Frames, 3D Objects, Groups and Materials except All_Ball_Sticky Group.

-
Export it as a nmo file. Note that directly saving to .nmo cannot preserve IC states, so you need to save it as a .cmo file first, and then rename this file to .nmo. Now you get your new ball type nmo file, put it in the 3D Entities folder as Ball_Sticky.nmo under your mod folder, and add one line to your Load message function:
m_bml->RegisterBallType("Ball_Sticky.nmo", "sticky", "Sticky", "Ball_Sticky", 10.0f, 0.0f, 1.4f,
	"Ball", 1.0f, 7.0f, 0.15f, 2.0f);
-
If your ball is not a perfect sphere (like Paper Ball), set the last parameter (radius) to -1.
You still need a transformer to bring your new ball type to Ballance.
-
Copy one of the original transformer files: P_Trafo_Wood.nmo, P_Trafo_Stone.nmo, and P_Trafo_Paper.nmo.
-
Rename it to your own ball type, and rename all objects in it including 3D Objects, Groups, Materials and Meshes.
-
Modify the Diffuse color of P_Trafo_Sticky_Color Material. For example, ball sticky uses pink (203, 103, 204) as its color. Remember to reset the IC state of all 3D Objects.
-
Put this file in 3D Entities/PH folder under your mod folder, and add one line to your Load message function:
m_bml->RegisterTrafo("P_Trafo_Sticky");
You may also want to add your own ball as one of the modul balls.
-
Copy the nmo file of your player ball, delete all redundant objects. You only need 4 objects in this file: one ball 3D Entity, one material, one mesh and one texture. Rename the ball 3D Entity to P_Ball_Sticky_MF, and create a group named All_P_Ball_Sticky and add all these 4 objects into it. Finally hide the ball object and set IC state for it.
-
Put this file in 3D Entities/PH folder under your mod folder, and add one line to your Load message function:
m_bml->RegisterModulBall("P_Ball_Sticky", false, 10.0f, 0.0f, 1.4f, "", false, true, false, 0.8f,
	7.0f, 2.0f);
-
If your ball is not a perfect sphere, use RegisterModulConvex instead:
m_bml->RegisterModulConvex("P_Ball_Sticky", false, 10.0f, 0.0f, 1.4f, "", false, true, false, 0.8f,
	7.0f);
Let's take the P_Rotboard_Wood modul from built-in mods as an example.
- Similar to custom ball types, first you need a 3D Frame named P_Rotboard_Wood_MF, and set all other 3D Entities as its children. Then create a Group named All_P_Rotboard_Wood, and add all other objects into it. After that hide all the 3D Entities, and set IC for them.

-
Then create two scripts under All_P_Rotboard_Wood: P_Rotboard_Wood_Init and P_Rotboard_Wood_MF Script.
-
P_Rotboard_Wood_Init will do some initialization, including getting the Ball_Pos_Frame and FixCube instance. Former one indicates position of player ball, so we can activate our modul when player ball enter a certain range, and the latter one is used in some Physicalizing Building Blocks. You can copy this script from Ballance moduls.
-
P_Rotboard_Wood_MF Script will physicalize or unphysicalize the modul depending on the current state. It read the value of CurrentLevel Array (Row: 0, Column: 4). It is a boolean value, true means it's time to physicalize and false means it's time to unphysicalize.
-
-
First Physicalize the board, then Set Physics Hinge to make it rotate around the center rod. Use TT Scalable Proximity to detect if player ball has enter a certain range, and Physics WakeUp the board if player ball is getting close.
-
When unphysicalizing, first disable TT Scalable Proximity, then destroy the physics hinge, finally unphysicalize the board and restore IC for P_Rotboard_Wood_MF.
-
The final script looks like:

-
Put this file in 3D Entities/PH folder under your mod folder, and add one line to your Load message function:
m_bml->RegisterModul("P_Rotboard_Wood");