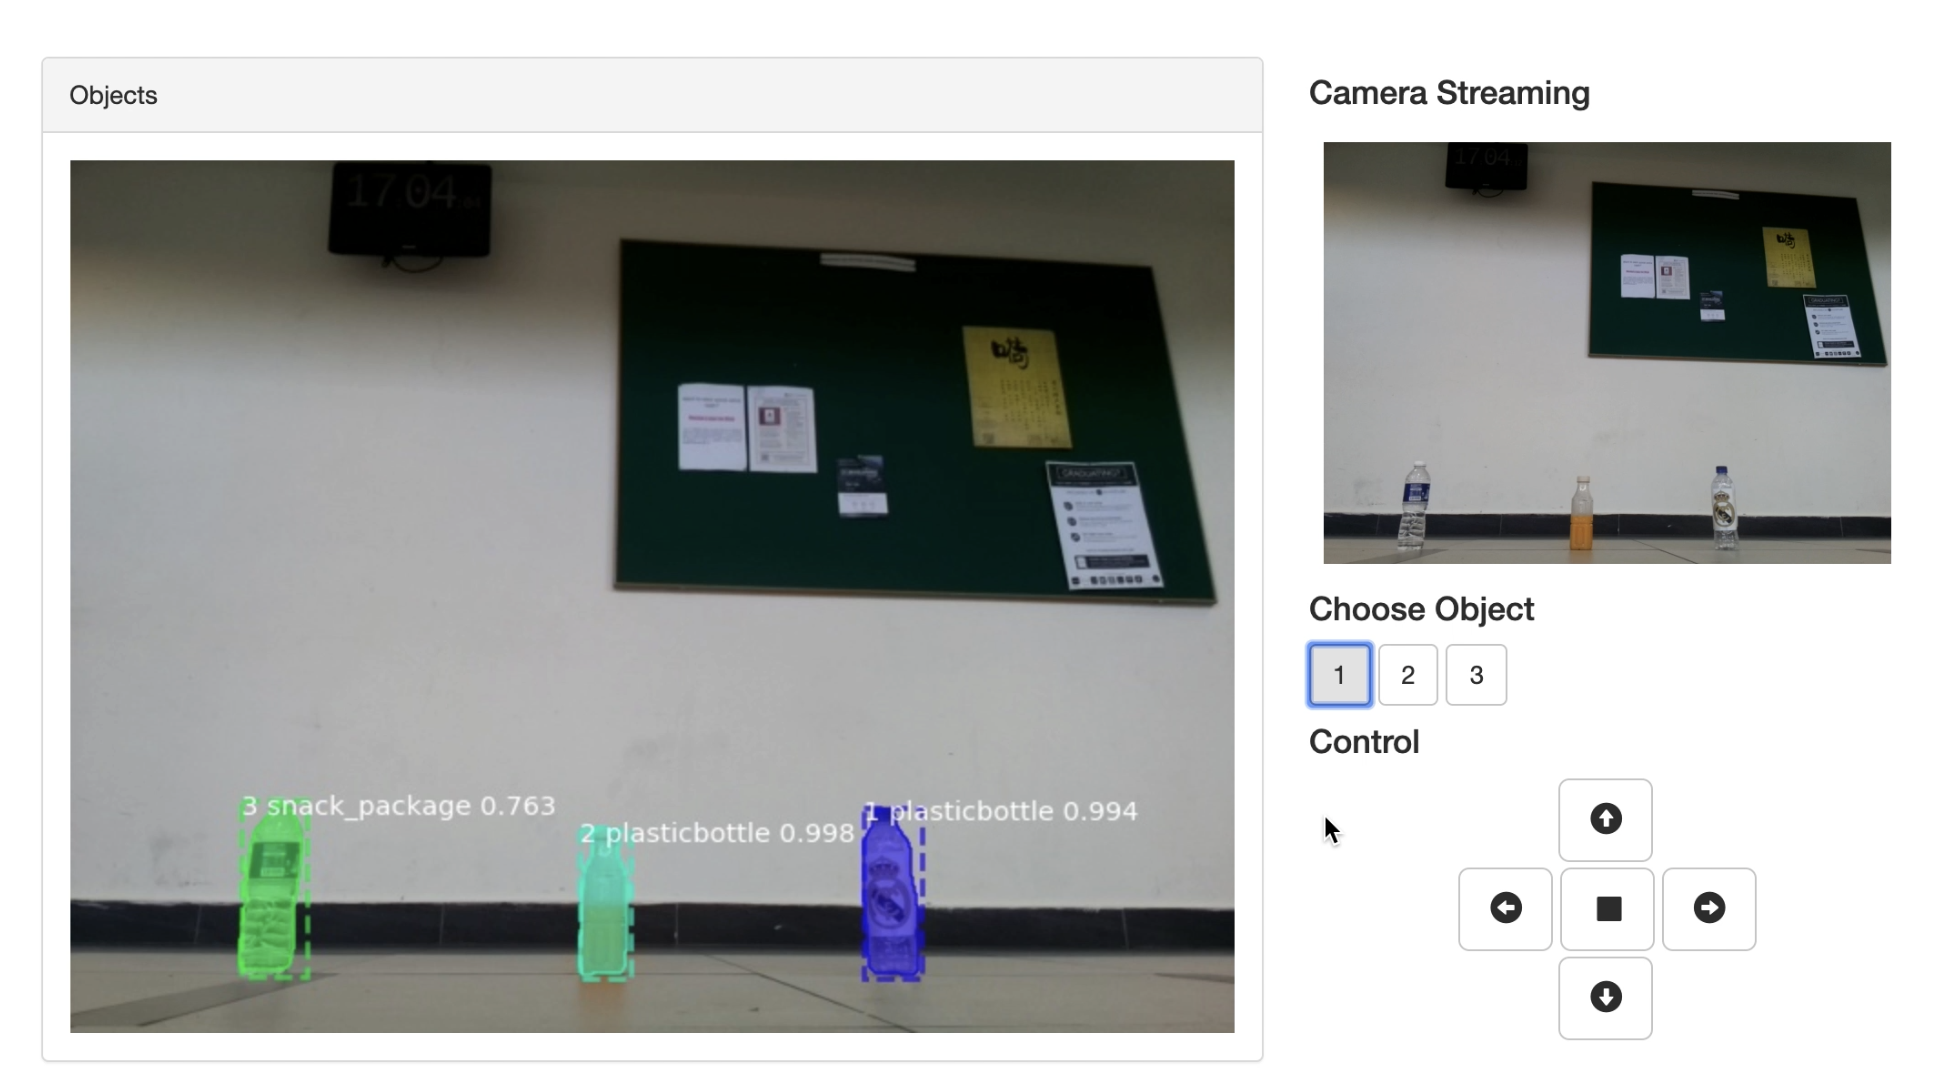
At first, we use Python’s built-in http.server module to make a video streaming server through PICamera, than we demonstrate an HTML file by using Bootstrap and dynamically update images and buttons on the web by JavaScript, we also use Bottle python web framework to build website background. Finally, it worked like this:
Bottle is a fast, simple and lightweight WSGI micro web-framework for Python. It is distributed as a single file module and has no dependencies other than the Python Standard Library.
- Routing: Requests to function-call mapping with support for clean and dynamic URLs.
- Templates: Fast and pythonic
built-in template engineand support formako,jinja2andcheetahtemplates. - Utilities: Convenient access to form data, file uploads, cookies, headers and other HTTP-related metadata.
- Server: Built-in HTTP development server and support for
paste,fapws3,bjoern,gae,cherrypyor any otherWSGIcapable HTTP server.
To run this web page, point your browser tohttp://pi-address:8080/.
Streaming video over the web is surprisingly complicated. At the time of writing, there are still no video standards that are universally supported by all web browsers on all platforms. Furthermore, HTTP was originally designed as a one-shot protocol for serving web-pages. Since its invention, various additions have been bolted on to cater for its ever-increasing use cases (file downloads, resumption, streaming, etc.) but the fact remains there’s no “simple” solution for video streaming at the moment.
However, we decide to use a much simpler format: MJPEG. So we use Python’s built-in http.server module to make a simple video streaming server. Once the script is running, visit http://pi-address:8000/ with web-browser we could view the video stream.
When we receive the returned images that have been classified, we need to update it on the web page in real-time. We can simply use JavaScript to change the URL of the image to achieve a partial refresh of the web page. Since the name of the returned image does not change, we need to add a timestamp after the image to make the browser reacquire the image instead of using images in the cache.
Based on the classified images, we can know the number of objects, the page will dynamically update the number of objects and use each button to represent each object as follow.:
When we select an object, the web page will send the selection signal back to the background. The background determines the rotation direction of the car according to the pixel distance of the object offset image center point and communicates with the Arduino through the serial port to control the movement of the car. Once the car is adjusted to the direction of the objects, the car begins to advance automatically, and in the meanwhile detecting the distance from the object through the ultra sonar and automatically stopping in front of the object. Isn’t that cool?
We created 5 icons like:
that control car moves forward, left, right, backward and stop. You can click on the corresponding button on the touch screen and control the car. Of course, for better user experience, we also did monitoring the keyboard keys and triggering the corresponding actions. You can simply press W A S D to control the direction of the car and press X to stop the car.
First, we use the object detection algorithm Mask RCNN to perform object detection on the video stream acquired by the Raspberry Pi. The identified objects are then classified by the InceptionV3. We learned to train the InceptionV3 model through migration to get good results.
We find it difficult (and slow) to run the deep learning networks on your Pi. (In fact, we found that it is difficult to load the model we built.) So we instead run our deep learning networks on the laptop. The easiest way to do this is to set up an MQTT Broker on the Pi, then modify our MQTT programs to connect to this new broker.
We use the Mask RCNN project implemented by Keras on GitHub for object detection. Without discussing the excellent performance of Mask RCNN on target detection, we found that its presentation of results is very suitable for garbage classification. It not only performs target detection but also splits the target at the pixel level to more intuitively display the location of the garbage.
It is easy to found that if you were to train a CNN on 30,000 images on a GPU, it can take up to 2 to 3 weeks to complete training.
For this exercise, we will use an extremely deep CNN called InceptionV3. InceptionV3 has over 300 layers, and tens of millions of parameters to train. Here we will use a version of InceptionV3 that has been pre-trained on over 3 million images in over 4,000 categories. If we wanted to train our InceptionV3 model from scratch it would take several weeks even on a machine with several good GPUs.
InceptionV3 consists of “modules” that try out the various filter and pooling configurations, and chooses the best ones.
Many of these modules are chained together to produce very deep neural networks:
The greatest beauty about InceptionV3 is that someone has already taken the time to train the hundreds of layers and tens of millions of parameters. All we have to do is to adapt the top layers.
MQTT (Message Queue Telemetry Transport) was created in 1999 by IBM to allow remotely connected systems with a “small code footprint” to transfer data efficiently over a TCP/IP network.
MQTT uses a publish/subscribe mechanism that requires a broker to be running. The broker is special software that receives subscription requests from systems connected to it. It also receives messages published by other systems connected to it, and forwards these messages to systems subscribed to them. MQTT has become very popular for the Internet of Things (IoT) applications, particularly for sending data from sensors to a server, and for sending commands from a server to actuators.
We run the classifier on our laptop, and the program to take pictures and send to the classifier on the Pi, and both will connect to the MQTT broker running on the Pi.


