First of all, thanks to Joey for creating awesome tutorial on making dev console in Unity. I've managed to use it for engineering app which grew pretty much. Without console we would have problems covering all cases (unit tests are not solution in most cases, at least for now..). If you are making bigger app/game, developer console is obligatory to save functional testing time in both editor mode or release. I made some modifications and wanted to share the results with You. The main change is that console allows to pass not only command but parameters allowing to create commands like obtaining PlayerPrefs key value, setting it, loading scene by identity or name. I have left some examples including help with two states, (without parameter, which shows list of possible commands) and (with parameter, showing details of specific command). Extra Coroutine ScrollDown() forces console to scroll down automatically after each command. There is also input field focus after pushing ~ button, so you don't need to use mouse to click on input just after turning console on. Predefined some hex colors and typical output messages. In the 03.07.2020 update project got expanded with clear command, clipboard holding latest commands that can be resued, command autocompletion(see changelog section below for details). I did not feed console with Debug messages but you can easily do it by yourself following Joey's second part of the tutorial over here and adjusting code. Project was created on Unity 2018.3.12f1. However in the latest update I upgraded it to Unity 2019.3.3f1 (64-bit).
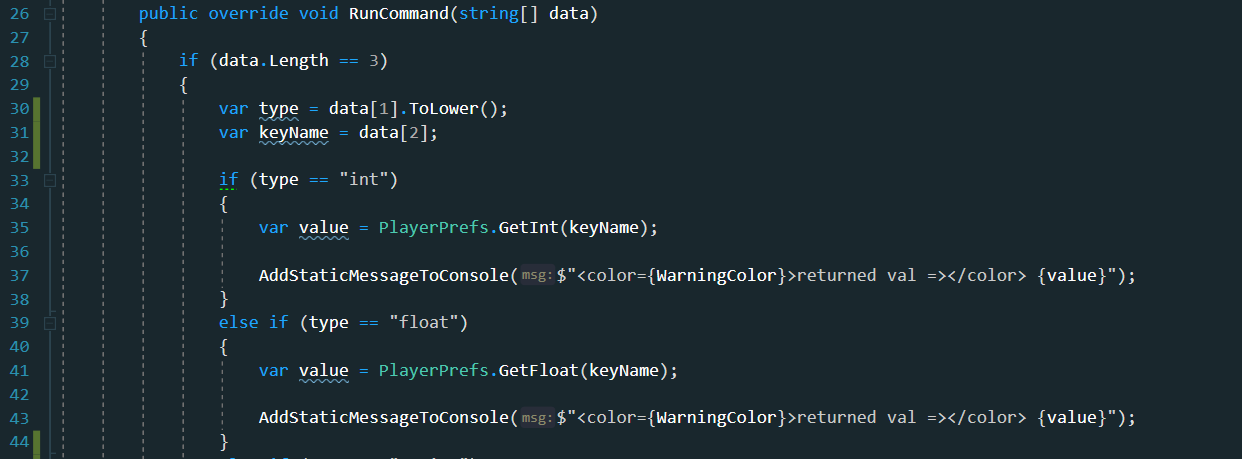
Take a look at code fragment above. The possibility to pass parameters is due to adding parameter to procedure RunCommand, string[] data (see line 26). How to process passed data? Well, before that, keep strongly in mind that resolving parameters in the example requires you to be careful on index reference and popular "out of range" exception. On each index you will find whole command cut into pieces. Check the following image.
Imagine that you want to get the value of the PlayerPrefs key (first example, left side). To do this you need from user to specify type of that key and it's name. The type will allow you to make proper conditionals to verify which method should be ran: GetInt, GetString etc. Keep also in mind that if you work on array you have fixed length. It is worth to feed all cases that can happen to prevent critical errors. With getting key value you can cover all types of keys and situation in which your data consists of more than 3 elements (command, type, key). If you want to change scene (second example) you need to be aware that before you use LoadSceneAsync(int sceneBuildIndex), you have to extract text under data[1], which stands for identity, then convert it into expected type (using for example Convert.ToInt32(param)). Instead of making two scripts like loadById and loadByName see CommandLoadScene in repository that covers both situations where first check handles whether user passed Id or scene name.
- added clear terminal command on request(CommandClearConsole),
- added simple command example that overwrites value from other script(CommandSetPlayerSpeed),
- added clipboard allowing to swap between previously used commands with up arrow/down arrow keys,
- added command autocompletion after clicking TAB key,
- changed console starting info colors,
- removed repeating text from CommandGetKeyValue,
- moved images to different branch.
- Joey The Lantern, github, youtube channel
- trolit, github
Joey's Unity Developer Console series is available here


