-
Notifications
You must be signed in to change notification settings - Fork 0
Contributing: Implementation Details
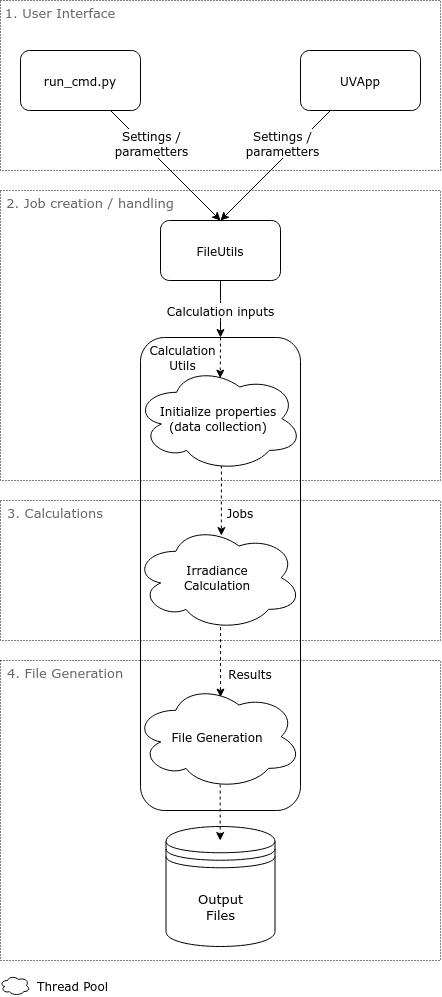
For this implementation section, we will split the functionality of the application in the following parts:
- User Interface
- Job creation / handling
- Calculations
- File Generation

Two user interfaces are available:
- Command line interface (CLI)
- Graphical User Interface (GUI)
Both interfaces are responsible for getting the necessary parameters from the user. The parameters include dates and brewer id to find the required files for the calculations as well as some settings.
The first interface's implementation is written in run_cmd.py and mostly consists of command line argument parsing.
Once the arguments are parsed, their values are passed to the CalculationUtils (See next section).
The second interface's implementation is more complex and consists of the following three files:
-
run.py(ordocker/run_docker.pyfor the docker image) which serves as an entry point to start the BUVIC App. -
buvic/gui/app.pywhich contains the BUVIC App class. -
buvic/gui/widgets.pywhich contains the implementation of some of the more complex interface's widgets.
The BUVIC class is the core of the GUI and uses the remi library.
The class initializes the widgets in its main method and adds them to its main container.
The most important of the interface's widgets are the MainForms (PathMainForm to give files as input and SimpleMainForm to give dates
and brewer id as input). They keep track of the values of their fields and settings and call the FileUtils and CalculationUtils (See
next section) with these values when the Calculate button is clicked.
Job creation and handling is done in the classes FileUtils and
CalculationUtils.
The first step is the creation of the CalculationInput for each of the given day.
The FileUtils class keeps track of the files in the file system and will initialize CalculationInput objects with the available files.
Before starting the the calculation, all the required data is collected by parsing the measurement files or querying eubrewnet
and this data is written to the CalculationInput objects.
Each data type has its own provider to collect the data. Their implementations can be found in the files
buvic/logic/uv_file.py, buvic/logic/ozone.py,
buvic/logic/arf_file.py, buvic/logic/calibration_file.py
and buvic/logic/parameter_file.py.
More information about how these providers are implemented can be found in the section
Adding Data Sources.
Note that the data collection is triggered automatically (and cached) when calling one of the following property on the CalculationInput:
-
uv_file_entries: get the uv data from a UV file or eubrewnet -
ozone: get ozone data from a B file or eubrewnet -
calibration: get calibration data from a UVR file or eubrewnet -
arf: parses the arf file -
parameters: parses the parameter file
An api call is also made to darksky.net (if an api key is provided) to get the cloud cover for the day of the measurements. This information is used to choose between a clear sky or a diffuse cos correction.
Each CalculationInput corresponds to one UV file (measurements for one day). Since multiple measurements are done each day (in each UV
file), the UV file is divided into sections, each represented as a UVFileEntry object.
In the end, one Job will be created for each UVFileEntry. Each Job needs therefore to get a CalculationInput as parameter as well as the
index of the section it does the calculation for.
Jobs can be created in four different ways:
-
calculate_for_input: Create jobs for a givenCalculationInput. Used when file paths are already known. -
calculate_for_all_between: Finds all the files for measurements between two days and create the jobs for them. -
calculate_for_all: Finds all files in a directory and create the jobs for them -
watch(deprecated): Monitors a directory and each time a file is found, callscalculate_for_input.
The difference between way 1. (and 4.) and ways 2. and 3. is that way 1 only create Jobs for one CalculationInput.
Ways 2. and 3. make calculation for multiple days and therefore create Jobs for multiple CalculationInput objects.
The calculations executed in each Job from the previous section are mostly implemented in
IrradianceCalculation.
The entry point in this class for the calculations is the method calculate.
this method has access to a CalculationInput object for infos about the measurement files and extra parameters as well as the index of the
section to do the calculations for.
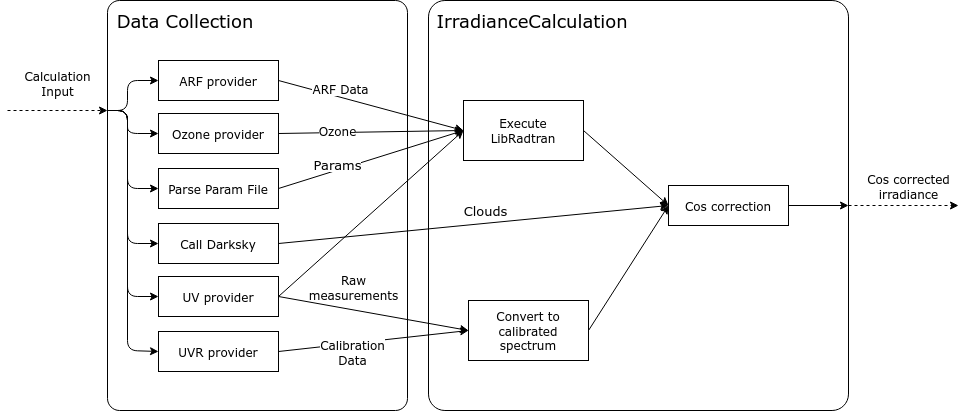
During the calculations, the raw measurements and the calibration data is used to convert the raw UV measurements to a calibrated spectrum.
A call to LibRadtran is made with the infos from the measurement and parameter files to get Fdiff, Fdir and Fglo.
Finally, the results from LibRadtran and from the darksky.net api call are used to apply the cos correction to the calibrated
spectrum.
This information as well as the input parameters used is returned from the calculate method as a Result object.
This Result object will later be converted to output files.
Here is an illustration of how each data type is used in the calculation:

Finally the Result objects are used to generate the output files.
Each output file either uses one Result if it represents the data for one section or multiple Results if it represents the data for a
whole day.
More information about file generation implementation can be found in the section Adding Output Formats.
The two main performance bottlenecks in this application are:
- API calls to EUBREWNET and darksky.net
- Calls to libradtran
Any other file parsing or calculation takes a negligible time in comparison to these two actions.
To improve significantly the performance of BUVIC, we use parallelization for these actions. This works best for API calls since we expect to be able to make many API calls at the same time before the internet connection is saturated. The calls to libradtran also have a performance gain from parallelization, thanks to the overhead of creating and handling the new process executing uvspec.
Parallelization is implemented with the python's ThreadPoolExecutor which makes it easy to run jobs on a pool of threads. Relevant code
parts are in the class CalculationUtils in methods calculate_for_inputs (data collection)
and _execute_jobs (calculation jobs). The number of threads used in the pool equal the number of cpu cores plus 4 with a limit at 20
threads.
If you have tried both the Docker and Python app, you have probably noticed that the docker version is a lot faster. This is due to the way BUVIC calls LibRadtran.
Due to the complexity of installing LibRadtran, BUVIC's python app doesn't run it directly but starts a docker image wrapping LibRadtran
(see libradtran_command.py).
The overhead of starting a docker container for every call to LibRadtran makes it quite slow.
The docker abstraction allows us however to directly include LibRadtran inside BUVIC's docker image. BUVIC in the docker image can therefore directly access the library without having to start another docker container.
Note that if you have LibRadtran installed locally, changing the libradtran_command.py to call the local installation should make the
python app about as fast as the docker image (not tested).

