-
-
Notifications
You must be signed in to change notification settings - Fork 599
DbAndroid
This plugin enables SQLiteStudio to connect directly to a database on Android device. A direct connection means that SQLiteStudio does not download/upload database file. It operates directly on the database that is located on your Android device.
The DbAndroid plugin will help you to manage databases of the application you're developing. It won't be able to access just any database on your device. Only those that belong to your application, or any application that was installed as "debuggable" version (not the "release" version).
- Add jar file and 2 lines of code to your application (not required for "sqlite3 command" connection type),
- Deploy application to your device,
- Connect to the database in your application from SQLiteStudio.
Starting with plugin version 1.2.0 (shipped with SQLiteStudio 3.0.8 or newer) you can get jar file by simply selecting from menu "Tools" -> "Get android connector JAR file" - you will be asked for directory where to store the jar file. That's it. You can grab it and add to your Android project.
Source code for the Jar (GPLv3) can found at: https://github.com/pawelsalawa/sqlitestudio-android
Below statement is obsolete and applies only to plugin version 1.1.x (shipped with SQLiteStudio 3.0.7 and older):
The jar file that is mentioned several times in this document can be downloaded from following link: http://sqlitestudio.pl/files/depends/SQLiteStudioRemote.jar
First of all - if you have any problems with getting the plugin to work for you, please contact us on e-mail or forum and we will assist you.
The plugin has three connection methods implemented, where two of them are depending on a jar file being included in your application and the third method uses "sqlite3" command from your Android device - if it's available. For more details on this read next chapter.
The plugin adds new database type to the Database dialog:

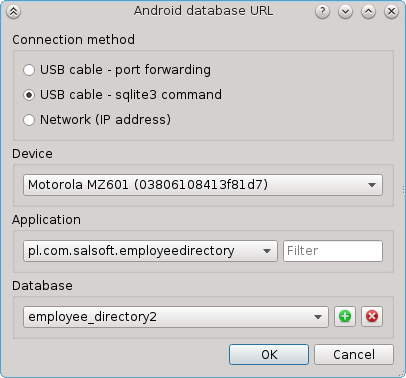
As you can see, the usual "File path" is replaced by "Android database URL" and it expects a quite complicated URL defining connection with your Android device. Fortunately, you don't need to type this URL by hand - if you click on "open" button on the right, you will be provided with a dialog window assisting you with this task:

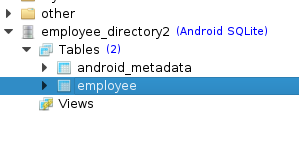
After you configure the connection and accepted the Database dialog, your database will be listed like any other database in SQLiteStudio (except it will have "Android SQLite" label):

DbAndroid plugin can connect to an Android database in three different ways. Each of them has its pros and cons.
Instructions for embedding and configuring the jar will be presented in the next chapter.
Just for a quick brief, a table with each connection type features:
| Connection type | USB cable required | Embedding jar required | sqlite3 command required | Connection speed | Security |
|---|---|---|---|---|---|
| USB cable - port forwarding | Yes | Yes | No | Very fast | Configurable (from low to high) |
| USB cable - sqlite3 command | Yes | No | Yes | Medium | Very high - no TCP socket open |
| Network (IP address) | No | Yes | No | Fast | Configurable (from low to high) |
Requires:
- USB cable connected from your computer to the target Android device.
- "adb" application from Android's SDK (the plugin will try to find it automatically and if it fails, it will ask you for help)
- The jar file embedded in your application.
Description:
Once the application with the jar is running on Android device, it will open TCP socket on configured port.
This method automatically creates port forwarding from the Android device to your local computer. After that it connects to localhost on the forwarded port and communicates with the remote application, having access you your application's database.
Usage:
When configuring this type of connection, the "Android database URL" dialog will ask you for:
- device (to pick from list of connected devices),
- port on the Android device - it's the one you configured with the jar file - different applications can use different ports,
- remote access password - this is optional and is required if you configured the access password for the jar,
- database name - it's the last parameter and you will be provided with list of existing databases in the target application, or you can create a new one.
Pros:
- Rather quick connection. It's a bit slower than a local SQLite3 database file, but still pretty responsive. It's probably the fastest among all three methods.
- Multi-client, configurable access to the same database.
- No "sqlite3" command dependency on the Android device.
- No "rooting" of the device is required.
Cons:
- The jar dependency requires initial setup of your application, but it's very quick, just read instructions in next chapter.
- "adb" (Android SDK) dependency on your local machine.
- The TCP socket on your Android device is available to everyone, who can reach the device through the network, unless you configured your jar to limit access (IP limits, password protection)
Requires:
-
USB cable connected from your computer to the target Android device.
-
"adb" application from Android's SDK (the plugin will try to find it automatically and if it fails, it will ask you for help)
-
"sqlite3" command available on your Android device. You can test if you have it by executing:
adb shell sqlite3 --version
If the answer is something like "
3.7.112012-03-2011:35:50" - you are fine. Otherwise you won't be able to use this connection method. This command is usually available on "rooted" devices and on Android emulators.
Description:
This method executes all queries through sqlite3 built-in command on your device.
Usage:
When configuring this type of connection, the "Android database URL" dialog will ask you for:
- device (to pick from list of connected devices),
- application name on the device (to pick from list of application received from the device)
- database name - it's the last parameter and you will be provided with list of existing databases in the target application, or you can create a new one.
Note, that not all applications can be accessed with this connection type. The Android application has to be built in Debug mode (not Release), otherwise the "adb" will not be able to access its database files directly.
Pros:
- No jar dependency in the application,
- Rather simple setup.
Cons:
- Application has to be built in Debug mode,
- The "sqlite3" command has to be available on the device,
- Is a bit slow when compared to the other two connection methods.
Requires:
- The jar file embedded in your application.
- The Android device being reachable by your computer through the network.
Description:
Once the application with the jar is running on Android device, it will open TCP socket on configured port.
This method connects directly to the Android device on the configured port and communicates with the remote application, having access you your application's database. It's pretty much the same as "USB cable - port forwarding", except it doesn't use USB cable, but instead connects to the device through the network.
Usage:
When configuring this type of connection, the "Android database URL" dialog will ask you for:
- IP address of the device,
- port on the Android device - it's the one you configured with the jar file - different applications can use different ports,
- remote access password - this is optional and is required if you configured the access password for the jar,
- database name - it's the last parameter and you will be provided with list of existing databases in the target application, or you can create a new one.
Pros:
- It's quite fast method, but it can be affected by the network latency,
- Multi-client, configurable access to the same database.
- No "adb" (Android SDK) dependency.
- No "sqlite3" command dependency on the Android device.
- No "rooting" of the device is required.
Cons:
- The jar dependency requires initial setup of your application, but it's very quick, just read instructions in next chapter.
- The TCP socket on your Android device is available to everyone, who can reach the device through the network, unless you configured your jar to limit access (IP limits, password protection)
As you may read in the previous chapter, two of three connection methods depend on the jar file being embedded in your Android application.
The jar file is provided to you together with the DbAndroid plugin package (see the JAR file chapter).
The following instructions assume you're using official Android Studio environment:
-
Add
INTERNETpermission toAndroidManifest.xmlof your application, because the SQLiteStudio's remote access service will need to open a TCP listening socket. Don't worry. It won't try to connect anywhere. It's just for the listening socket:<uses-permission android:name="android.permission.INTERNET" />
-
Copy provided jar file into your project's "libs" subdirectory.
-
Right-click on the project and "Open module settings".
-
Go to dependencies, click on a "plus" button to add new dependency, choose "File dependency".
-
Select the jar file from libs directory.
-
Click Ok.
-
Open your application's main activity java code.
-
In "
onCreate()" method add:SQLiteStudioService.instance().start(this);
-
In "
onDestroy()" method add:SQLiteStudioService.instance().stop();
(add
onDestroy()if it doesn't exist - it's important to stop SQLiteStudio service). -
The final code should look something like that:
// ...
import pl.com.salsoft.sqlitestudioremote.SQLiteStudioService;

public class MainActivity extends ActionBarActivity {

    @Override
    protected void onCreate(Bundle savedInstanceState) {
        super.onCreate(savedInstanceState);
        setContentView(R.layout.activity_main);

        SQLiteStudioService.instance().start(this);
    }

    @Override
    public void onDestroy() {
        SQLiteStudioService.instance().stop();
        super.onDestroy();
    }
    // ...
}
Now build and deploy your application. After you start it, you should be able to connect with it on port 12121 - that's the default port.
Using custom port number:
SQLiteStudioService.instance().setPort(9999);This option is especially usful if you need more than one application accessible through SQLiteStudio remote service.
Limiting access basing on client's IP:
By default everybody can access the service. You can ban certain IP addresses with addIpToBlackList():
SQLiteStudioService.instance().addIpToBlackList("192.168.0.15");The method accepts wildcard masks, so you can ban whole IP class:
SQLiteStudioService.instance().addIpToBlackList("192.168.0.*");And you can make exceptions from banned masks:
SQLiteStudioService.instance().addIpToBlackList("192.168.0.*");
SQLiteStudioService.instance().addIpToWhiteList("192.168.0.14");
The white list has a precedence over the black list. You can deny everybody and allow only your machine with:
SQLiteStudioService.instance().addIpToBlackList("*");
SQLiteStudioService.instance().addIpToWhiteList("192.168.0.14"); // my IP
Securing access with password:
SQLiteStudioService.instance().setPassword("super_secret!!!");This is the password you will need to provide in the "Remote access password" field when adding this Android database in SQLiteStudio.
Under Linux adb has sometimes problems with accessing Android devices on USB, unless the ADB daemon was started from root, so try killing adb (adb kill-server) and running it with root privileges (sudo adb start-server). If this was the cause of the problem, then you should see your device now when listing it with adb devices, even as a regular Linux user.
After you plug-in your USB cable to Android device observe the screen of the device - you should be asked if you permit debugging this device. If you disagree, or leave it unanswered you will get the message like above and you will not be able to use SQLiteStudio with such device.
This can happen for "sqlite3" connection type. It usually means that the application on the device has limited file/directory permissions in /data/data/aa.bb.cc. Adding rw permissions for files and rwx for directories should fix the problem. Note, that this operation requires device to be rooted.
Please contact us on e-mail or forum and we will assist you.
Source code (Android Studio project) for the JAR file is available in subversion repository:
svn://sqlitestudio.pl/sqlitestudio-android/trunk
Built jar file can be found in DbAndroid plugin's source code, which is available in common repository for whole SQLiteStudio project source code.