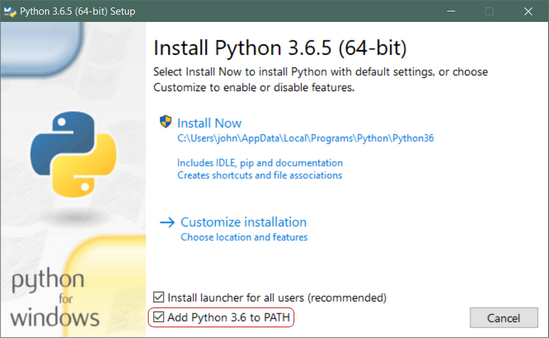
Do this only if you don't hav python installed in your machine othewise proceed to 2).
-
Open a browser window and navigate to the Download page for Windows at python.org.
-
Underneath the heading at the top that says Python Releases for Windows, click on the link for the Latest Python 3 Release - Python 3.x.x. (As of this writing, the latest is Python 3.8.2).
-
Scroll to the bottom and select either Windows x86-64 executable installer for 64-bit or Windows x86 executable installer for 32-bit.
Run the downloaded Installer to install python as any other software in windows.
Important: You want to be sure to check the box that says Add Python 3.x to PATH as shown to ensure that the interpreter will be placed in your execution path.
open a powershell window and run python --version to check if python is installed.
the output should be something like
Python 3.8.2
Go to the following link to find the instructions for setting up wsl1 on your windows 10 machine.
Now before you could install python on wsl you need to initialize your distro instance once, before it can be used.
after you have initialized your distro once. Fire up wsl and run the following command to install python(same as any linux installation).
sudo apt install python3
after a succesful installation run python --version to see if it has been correctly installed.
If you have ubuntu 17.10 or higher they already come with python3.6 by default.
if you have a lower version Fire up a terminal window by pressing Ctrl+Alt+T.
and run the following command:
sudo apt-get install python3.6
now you have python installed in your machines, Fire up a terminal window(command prompt for windows) and follow these steps to setup a dummy project
Python now comes with pip by default. But most of the time, it comes with an old version. it is always a good practice to upgrade pip to the latest version
python -m pip install --upgrade pip
The main purpose of Python virtual environments is to create an isolated environment for Python projects. This means that each project can have its own dependencies, regardless of what dependencies every other project has.
In the same shell window run the following command
pip install virtualenv
let’s create a project directory. We will name it django_project
To create the directory:
mkdir django_project
Change into the django_project directory:
cd django_project
if you have python3 this command will generate a virtuan environment by the name of env. If you have python2 replace venv with virtualenv.
python -m venv env
Before you can start installing or using packages in your virtual environment you’ll need to activate it.
On macOs or Linux
source env/bin/activate
On Windows
.\env\Scripts\activate
Run the following command to install django in your current active virtual environment.
pip install Django
to check if it is installed properly run
python -m django --version
To see if everything works fine we will create a django project.
from the last step continue by running
django-admin startproject mysite
to create a new project.
now there would be a folder created by the name of mysite.
go inside that folder
cd mysite
and run
python manage.py migrate
to create migrations.
now run
python manage.py runserver
and go to the address that is shown in the command prompt window which would most probably be 127.0.0.1:8000.
after you enter it in a browser this webpage will be opened.

