-
Notifications
You must be signed in to change notification settings - Fork 45
Hardware installation (Garmin)
The Garmin HD and xHD radars are very easy to use with OpenCPN. All you need is a wired Ethernet connection.
You can add as many computers as desired, the system will allow operation from all connected MFDs (plotters) and computers.
Note: Unlike the older GRadar plugin, the new common plugin does not distinguish between slave and master mode. You can always control the radar from both an (optional) chartplotter and the OpenCPN computer(s).
If you already have a Garmin MFD installed the installation consists of:
- Installing an Ethernet switch, or a WiFi router with a built in Ethernet switch. You need a wired port for each device -- the radar, the MFD(s) and the computer running OpenCPN.
- Connect all devices to the switch.
You cannot connect the computer to the auxiliary ethernet ports on the scanner, and possibly also not if the chartplotter has multiple Ethernet ports -- the latter is untested.
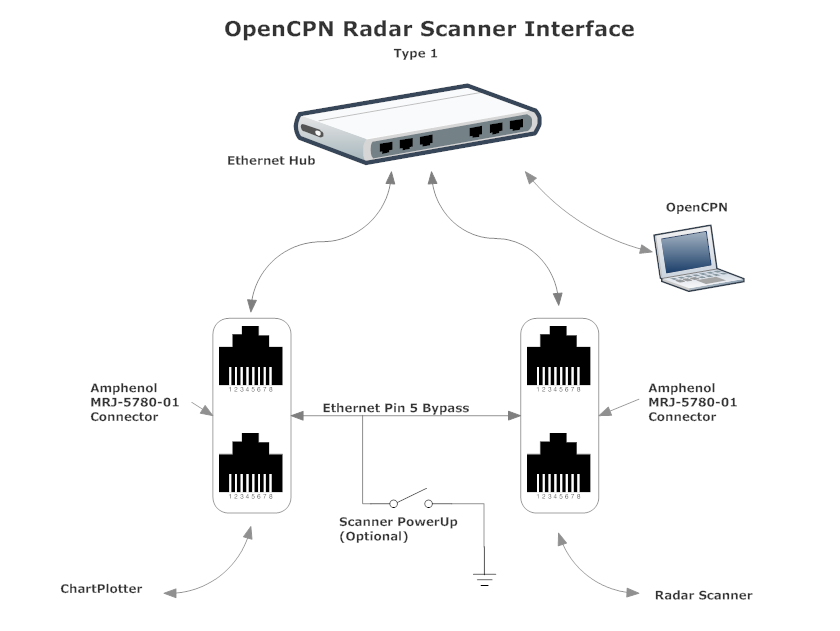
IMPORTANT NOTE: If you do not use a Garmin Ethernet switch, you will need to bypass pin 5 on all ethernet ports connected to a Garmin device. The Garmin devices use pin 5 as a power up signal when it is shorted to ground (the shield of the ethernet cable.)
A typical installation with a generic switch would look like this:

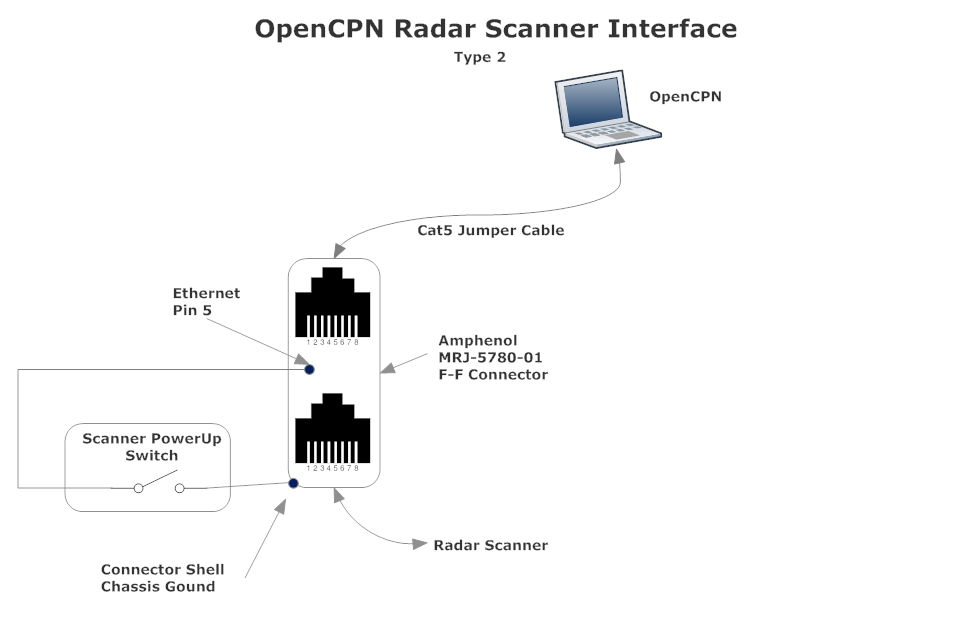
When there is no Garmin chartplotter involved, you can make a direct connection between the computer and the scanner, but in this case it is imperative that you make pin 5 switchable to power up the scanner. An example configuration could look like this:

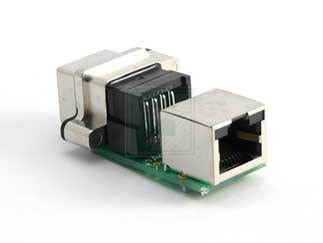
A convenient method to access the Ethernet radar scanner power control pin (Pin5) is to use a Female-Female Ethernet adapter plug. A readily available commercial adapter is recommended, such as the Amphenol MRJ578001 adapter. This particular component contains a small PC board which allows easy access to the individual Ethernet cable pins for bypass jumper and switch attachment.

An example supplier is Digikey: Digikey Amphenol MRJ578001 adapter
The Garmin radars and chartplotters all use automatic or static IP addresses (without a DHCP server) in the range 172.16.1.0 with netmask 255.255.240.0. The plugin will not work, and actively complain, if it cannot find an ethernet card with an address in this range.
The recommended way to use the radar is to use a dedicated ethernet port that is assigned the following data:
IP address: 172.16.1.1
Netmask:    255.255.240.0
It does not need a router or DNS address.
If you share the ethernet port that you use for the radar with other uses, for instance to connect to a router that connects you to the internet, this is still possible but is a little more complex. This involves adding an alias port, which allows a single physical ethernet card to have multiple IP addresses.
With Linux, you can do this as follows:
$ sudo ifconfig eth1:1 172.16.1.1 netmask 255.255.240.0 up
where eth1 will vary with your hardware.
If you want to set this permanently, this is possible as well. Check your OS manual for more details, but if your OS supports the /etc/network/interfaces file you can add the following stanza:
auto eth1:1
iface eth1:1 inet static
    name Garmin special
    address 172.16.1.1
    netmask 255.255.240.0
This configuration system used to be almost ubiquitous, but recent Linux versions may also use SystemD for networking in which case the setup is different (and not explained here yet.)
In Microsoft Windows, it is also possible to setup alias IP addresses. For example, in Windows XP you may select
Network Adapter > Properties > TCP/IP > Properties > Advanced. Here you may enter any additional IP addresses (aliases) as required. Use IP address 172.16.1.1 with a netmask of 255.255.240.0. Note that on Windows, alias IP addresses may only be set if all static IP addresses are enabled, and DHCP auto configuration is not used.