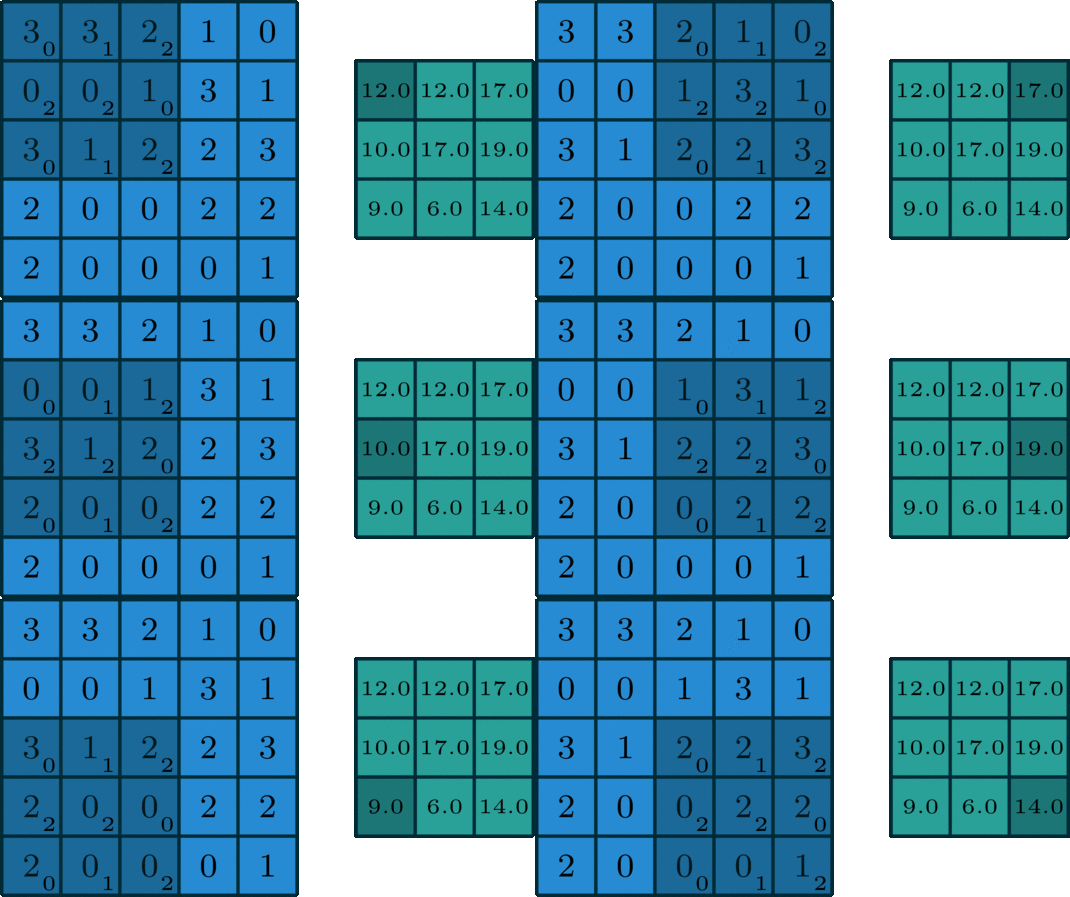
Convolution is an operation commonly used in machine learning that involves "sliding" a small filter (a matrix of numbers) over a larger input matrix and computing a dot product between the two matrices at each position. This process creates a new output matrix that summarizes how the input matrix features match the filter pattern.
Following methods have been implemented in this repository from scratch
- Convolution Operation on a single 2D image using a single filter.
- Convolution Operation on a single 3D (RGB) image using a single filter.
- Maxpool operation on a batch of RGB images.
- Convolution Operation on a batch of RGB images using multiple filters
- The results we get from custom opeartions are same as Tensorflow's and Pytorch's output of Conv2d layer.
- To check the results run the folllowing commands
- python tensorflow_test.py
- python pytorch_test.pyAs we can see we can get the convoluted output using convolution_operation_2D_Image, let's have a look at the function
import numpy as np

def convolution_operation_2D_Image(input_image, kernel, stride, pad):
    """
    Performs a 2D convolution operation on a given input_image with a given kernel.

    Args:
    input_image (numpy array): a 2D array representing the input image
    kernel (numpy array): a 2D array representing the weights used for the convolution
    stride (int): the stride used for the convolution operation
    pad (int): the amount of zero padding to be added to the input image

    Returns:
    final_output (numpy array): a 2D array representing the result of the convolution operation
    """

    # Get the height and width of the input image and kernel
    input_height, input_width = input_image.shape
    kernel_height, kernel_width = kernel.shape

    # Add zero padding to the input image based on the given pad value
    padded_image = np.pad(input_image, pad, 'constant', constant_values=(0, 0))

    # Calculate the output height and width based on the input size, kernel size, stride, and pad
    output_height = int((input_height - kernel_height + 2 * pad) / stride) + 1
    output_width = int((input_width - kernel_width + 2 * pad) / stride) + 1

    # Create an empty array for the final output
    final_output = np.zeros((output_height, output_width))

    # Loop through each element of the final output array
    for h in range(output_height):
        h_start = h * stride
        h_end = h_start + kernel_height

        for w in range(output_width):
            w_start = w * stride
            w_end = w_start + kernel_width

            # Get the image patch corresponding to the current output element
            image_patch = padded_image[h_start:h_end, w_start:w_end]

            # Perform a convolution step on the image patch and the kernel
            #element wise multiplication of two similar sized matrix and taking element wise sum of resultant matrix
            final_output[h, w] = np.sum(np.multiply(image_patch, kernel))

    # Return the final output array
    return final_output
The input layer and the filter have the same depth (channel number = kernel number). The 3D filter moves only in 2-direction, height & width of the image (That’s why such operation is called as 2D convolution although a 3D filter is used to process 3D volumetric data). At each sliding position, we perform element-wise multiplication and addition, which results in a single number. In the example shown below, the sliding is performed at 5 positions horizontally and 5 positions vertically. Overall, we get a single output channel. The code convolution operation for a single image using a single kernel is in 3d_convolution.py
While writing code in Tensorflow or Pytorch we perform the convolution operations on a batch of images. The input given is is the form batch_size x height_image x width_image x num_channels whereas the kernerl_input is given in the form num_filters x filter_size X filter_size x filter_channels.
The output we get after these operations is (batch_size x output_height x output_width x filter_channels)
We always perform 2D convolution operation on a batch of 3D input images with a given kernel. The code for Convolution operation in batch of RGB images using multiple filters is in batch_convolution.py
Following code compare the output after applying Tensorflow's Convolution 2D layers and Custom function for a batch of input images.
import tensorflow as tf
from tensorflow.keras.layers import Conv2D
import numpy as np
import batch_convolution

np.random.seed(1)
# Generate random data
## 4 random RGB images of size 9x9x3
input_image_batch = np.random.rand(4, 9, 9, 3).astype(np.float32)
kernel = np.random.rand(8, 5,5 ,3).astype(np.float32)

# Apply custom convolution_operation_batch_3D_images

output_custom =batch_convolution.convolution_operation_batch_3D_images(input_image_batch,kernel,stride=1, pad=2)
print('Output shape of custom convolution')
print(output_custom.shape)


# Apply TensorFlow's Conv2D layer
init=tf.constant_initializer(kernel.transpose(1,2,3,0))

conv_layer = Conv2D(filters=8, kernel_size=5, strides=1, padding='same', use_bias=False,kernel_initializer=init)

output_tensorflow = conv_layer(tf.constant(input_image_batch))
output_tensorflow = output_tensorflow.numpy()
print('Output shape of tensorflow convolution')
print(output_tensorflow.shape)
# Compare outputs
print('*'*50)
assert np.allclose(np.round(output_tensorflow,2), np.round(output_custom,2), rtol=1e-5, atol=1e-8)
print("Outputs of both methods are the same")
print('*'*50)
Here's the output we get after running the code
- Implementing Backpropagation on Convolutional and Maxpool layers from Scratch
=======


