-
Notifications
You must be signed in to change notification settings - Fork 0
sso_for_tcbl
This page explains the Single Sign On (SSO) functionality for the TCBL project.
SSO makes use of the OpenID Connect protocol. Before continuing to read here, it is a good idea to read a bit about the protocol in general to understand the basics. There is plenty of documentation on the website of OpenID Connect.
After reading you should at least remember that there needs to be an OpenID Connect Provider (OP) and that each service that wants to use it has to set up a client that implements a Relying Party (RP) .
If you work through this page, your End-Users that have signed up for TCBL will be able to sign in to your platform, using the steps of the OpenID Connect protocol as explained in the OpenID Connect core overview:
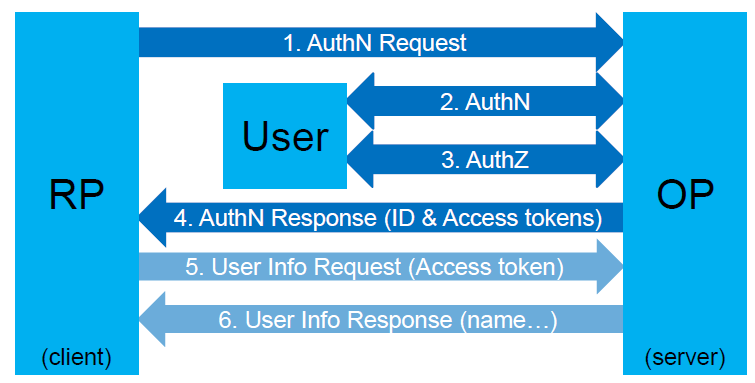
- The RP (Client) sends a request to the OpenID Provider (OP). This is a result of the End-User requesting to login at the client's website.
- The OP authenticates the End-User. This presents the authentication screen to the End-User (see below).
- The OP obtains authorization to use End-User's data. This presents the authorization screens to the End-User (see below).
- The OP responds with an ID Token and usually an Access Token.
- The RP can send a request with the Access Token to the UserInfo Endpoint. Example: the name of the End-User.
- The UserInfo Endpoint returns Claims about the End-User.
These steps are illustrated in the following diagram:

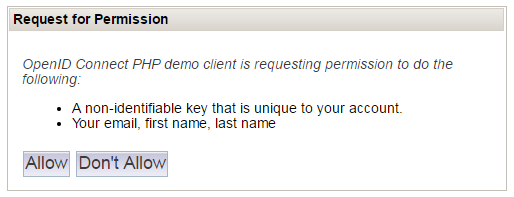
These are examples of the screens presented to the End-User during this process. Images are captured from the demo mentioned below. The layout may change...
- authentication screen

- authorization screen

The authorization screen will not be displayed for all but the very first login, if on the server authorization is set to persist for this client.
The TCBL project has its own OP. In fact it has two of them: the offical one (production) and one for testing:
- the TCBL SSO production server is at base address https://tcblsso.ilabt.iminds.be. Refer to this one for final application.
- a TCBL SSO test server is at base address https://tcblsso2.ilabt.imec.be. You can refer to this one while testing, but beware its data may be erased without notifications.
These servers are running the Gluu server package for this purpose.
A demo client using the PHP programming language is available on line for trying out. It can also be used as a code example or as a test on your own platform.
Each provider of a service is an RP and has to set up his own client and integrate TCBL SSO.
Below follows a step by step guide for setting up your own client and some guidelines for integrating SSO into your application.
There is no general rule for this of course.
Generally spoken, you'll need:
- a web server, serving over https, with a valid Certification Authority signed SSL certificate
- support on your platform and in your web server for the programming language / framework used for your client code
While OpenID Connect is still in development, there are some working libraries out there for different programming languages.
These libraries typically perform all steps described below transparently or with minimal effort.
There are also plugins available for CMSes like Wordpress and Drupal.
If you don't find a library that suits, you can of course write a client on your own: the specification is publically available.
When choosing a library or plugin, prefer one that supports Authentication using Authorization Code Flow, which is summarized as:
- Client prepares an Authentication Request containing the desired request parameters.
- Client sends the request to the Authorization Server (or Authorization Endpoint at the OP).
- Authorization Server Authenticates the End-User.
- Authorization Server obtains End-User Consent/Authorization.
- Authorization Server sends the End-User back to the Client with an Authorization Code.
- Client requests a response using the Authorization Code at the Token Endpoint.
- Client receives a response that contains an ID Token and Access Token in the response body.
- Client validates the ID token and retrieves the End-User's Subject Identifier.
An OpenID Connect Provider has different endpoints for different tasks (register a client, authorize, request user information) and can have a number of configuration options.
To automatically get the endpoints and other configuration, the protocol defines Discovery and Gluu supports it.
First, you need to find the URL of the OpenID Connect Provider (OP), also called the issuer. You can either believe me when I'm saying it's the same as the TCBL SSO server base address or you can find out by using a WebFinger request, with parameters as defined in the spec:
-
resource=https://tcblsso.ilabt.iminds.be(for the TCBL SSO production server) -
rel=http://openid.net/specs/connect/1.0/issuer(what we're asking for)
Sending a GET request with the mentioned parameters to the TCBL SSO production server's WebFinger location as in the following curl command:
$ curl 'https://tcblsso.ilabt.iminds.be/.well-known/webfinger?resource=https%3A%2F%2Ftcblsso.ilabt.iminds.be&rel=http%3A%2F%2Fopenid.net%2Fspecs%2Fconnect%2F1.0%2Fissuer'
returns :
{
    "subject": "https://tcblsso.ilabt.iminds.be",
    "links": [{
        "rel": "http://openid.net/specs/connect/1.0/issuer",
        "href": "https://tcblsso.ilabt.iminds.be"
    }]
}
The issuer is the value of href in the answer. So I was telling the truth...
Now that the issuer is known, you can ask for the detailed configuration of the OP
to the issuer's configuration location /.well-known/openid-configuration.
This is obligatory if you need to configure your client manually.
If your client library supports dynamic client configuration, the library will do this for you (as we'll see later).
But you may want to check the configuration anyway, e.g. to verify the available scopes and claims.
Sending a GET request to the TCBL SSO production server's issuer's configuration location as done in the following curl command:
$ curl https://tcblsso.ilabt.iminds.be/.well-known/openid-configuration
(or simply browsing to that location) returns (example output for illustration purposes only, parts omitted and replaced by (...)):
{
    "issuer": "https://tcblsso.ilabt.iminds.be",
    "authorization_endpoint": "https://tcblsso.ilabt.iminds.be/oxauth/seam/resource/restv1/oxauth/authorize",
    "token_endpoint": "https://tcblsso.ilabt.iminds.be/oxauth/seam/resource/restv1/oxauth/token",
    "userinfo_endpoint": "https://tcblsso.ilabt.iminds.be/oxauth/seam/resource/restv1/oxauth/userinfo",
    "clientinfo_endpoint": "https://tcblsso.ilabt.iminds.be/oxauth/seam/resource/restv1/oxauth/clientinfo",
    "check_session_iframe": "https://tcblsso.ilabt.iminds.be/oxauth/opiframe",
    "end_session_endpoint": "https://tcblsso.ilabt.iminds.be/oxauth/seam/resource/restv1/oxauth/end_session",
    "jwks_uri": "https://tcblsso.ilabt.iminds.be/oxauth/seam/resource/restv1/oxauth/jwks",
    "registration_endpoint": "https://tcblsso.ilabt.iminds.be/oxauth/seam/resource/restv1/oxauth/register",
    "validate_token_endpoint": "https://tcblsso.ilabt.iminds.be/oxauth/seam/resource/restv1/oxauth/validate",
    "id_generation_endpoint": "https://tcblsso.ilabt.iminds.be/oxauth/seam/resource/restv1/id",
    "introspection_endpoint": "https://tcblsso.ilabt.iminds.be/oxauth/seam/resource/restv1/introspection",
    "scopes_supported": [
        (...)
        "openid",
        (...)
        "minimum",
        (...)
    ],
    (...)
    "claims_supported": [
    	(...)
        "email",
    	(...)
        "given_name",
    	(...)
        "family_name",
    	(...)
    ],
    "scope_to_claims_mapping": [
    	(...)
        {"openid": []},
    	(...)
        {"minimum": [
            "email",
            "given_name",
            "family_name"
        ]},
    	(...)
    ],
    (...)
}}Before a client can act as a Relying Party (RP) and thus act on behalf of a user, it has to be registered at the OP. Gluu supports Dynamic Client Registration and Manual Client Registration.
OpenID Connect specifies Dynamic Client Registration, which allows client applications to register themselves without manual administration on the OP (Gluu API doc). Most libraries support this, so this is to prefer above manual registration.
This is easy, because only a very limited amount of information needs to be given to the API call that handles the registration. This information is usually limited to
- the OP's URL
- the client's redirect URLs
- the name you give to your client.
The API call will return the client ID and client secret for you to use in your application. Save these values carefully, because no one else knows them !
Note that you'll have to contact us before registering your client: dynamic client registration is disabled by default on our server; we'll only open it for a short time interval upon request.
You'll need to contact us again after registering you client, so that we can make the client registration permanent on our server; by default dynamically registered clients expire after 24 hours!
Though not recommended, manual client registration is sometimes the only option (depending on your library/plugin).
In this case: contact us to do the manual configuration on the TCBL SSO server. We will aks you to provide all needed client parameters in order to perform the registration.
We'll provide your client ID and client secret.
Use these and the OP configuration information you can retrieve from https://<server>/.well-known/openid-configuration
to configure you client.
Only use the following scopes. Access to other scopes is not granted.
- "openid"
- "minimum"
Use the following user information.
- from scope "openid":
- "sub": use this to identify the End-User (from the spec: 'Subject Identifier. A locally unique and never reassigned identifier within the Issuer for the End-User, which is intended to be consumed by the Client, e.g., 24400320 or AItOawmwtWwcT0k51BayewNvutrJUqsvl6qs7A4 . It MUST NOT exceed 255 ASCII characters in length. The sub value is a case sensitive string')
- from scope "minimum":
- "email": the End-User's email address (also used as username to login in our TCBL SSO case)
- "given_name": the End-User's first name
- "family_name": the End-User's last name (including middle name, if there is one)
If possible, use the "Login with TCBL" logo to create a login button in your application. This standard logo will make TCBL login recognisable over all associated services. The logo can be found at https://tcblsso.ilabt.iminds.be/resources/logos/login-with-TCBL.png.
Let the login page and authorization page appear as a replacement (redirect) of the current website contents. This means you don't set parameter "display" to value "popup" in the authentication request.
If possible, do not duplicate TCBL user information into your platform's local database. Instead, identify End-Users that are logged in using TCBL SSO by their "sub" user information field (as given above in the scopes) and update user information at every login from the available scopes.