-
Notifications
You must be signed in to change notification settings - Fork 11
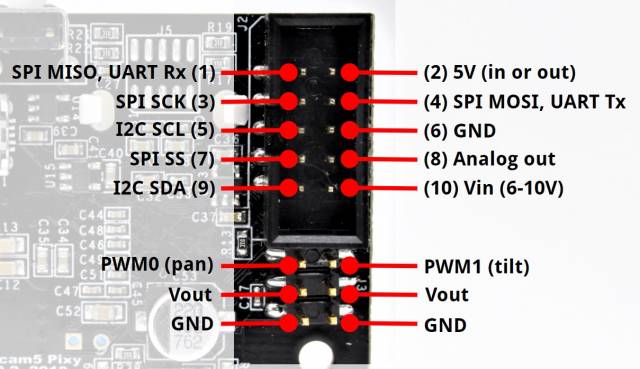
Wiring the Pixy2 to a RoboRIO
SPI is the recommended link type due to it's higher data transfer rate as well as better implementation in the WPILib API which helps with efficiency.
| Pixy2 Port | RoboRIO Port |
|---|---|
| 1 | MISO |
| 2 | 5V |
| 3 | SCLK |
| 4 | MOSI |
| 6 | ⏚ Ground |
| 7 | CS0 (Optional) |
NOTE: Pin 7/CS0 pin is the optional SPI Slave Select (SS) pin. It can be connected to any SS pin on the RoboRIO, CS0, CS1, CS2 or CS3. If slave select functionality is not needed, set the Pixy2 to use the data output Arduino ICSP SPI. Use SPI with SS for slave select support. In the code, the slave pin in use can be selected by using an initialization argument of the corresponding pin. 0 for CS0, 1 for CS1, etc.
| Pixy2 Port | RoboRIO Port |
|---|---|
| 2 | 5V (from VRM) |
| 5 | SCL |
| 6 | ⏚ Ground |
| 9 | SDA |
NOTE: The RoboRIO does not have a 5V output for I2C, and thus, the 5V must be sourced elsewhere, such as from the VRM, or another 5V pin.
| Pixy2 Port | RoboRIO Port |
|---|---|
| 1 | RXD |
| 2 | 5V (from VRM) |
| 4 | TXD |
| 6 | ⏚ Ground |
WARNING: The RoboRIO RS-232 port outputs an RS-232 serial signal, which is incompatible with the Pixy2's TTL serial signal and may result in damage to the Pixy2. An RS-232 to TTL converter board can be used, or the Pixy2 can be wired to the TTL serial pins in the RoboRIO's MXP expansion port.
NOTE: The RoboRIO does not have a 5V output for UART/Serial/RS-232, and thus, the 5V must be sourced elsewhere, such as from the VRM, or another 5V pin.
