Measure your Alpha Wave using OpenBCI 32-bit board with iOS App. This is a simple demo to demonstrate the ability of OpenBCI board to:
- Process data onboard.
- Communicate with mobile apps via Bluetooth directly (iOS & Android).
In order to get this demo working, we need to customized the software at:
- OpenBCI Board Microcontroller (How to?)
- OpenBCI Radio (How to?)
- Install mobile app from the source codes
In the learning section of OpenBCI, you can find all the tutorial you need to know how to upload the customized codes to the board & radios. I'm not going over those tutorials again; instead, I'll focus on the communicating with the board & the algorithm used to process the data.
In order to communicate with the board via bluetooth, we need to setup the board radio, RFduino, to receive data from the board & stream it out to the Mobile App. Also, we need to setup the board to receive data, commands, from the App and carry it to the board. Lastly, just install the App in your mobile device using the source code.
The 32bit OpenBCI Board implements the PIC32MX250F128B microcontroller, which comes with lots of local memory and fast processing speeds. The OpenBCI 32-bit board comes already pre-flashed with the chipKIT™ bootloader, and the latest OpenBCI firmware. This software is intended to stream raw data from the board to a PC via two radios modules; Rfduino on board & Rfduino on the USB dongle. However, we can customize the microcontroller's code to process the raw data, act on data, and do many things :)
When I was working on this project, I had more than one idea to demonstrate this work, but I decided to work on a frequency-based BCI application. In particular, to measure the Alpha amplitude since it almost everyone (~85%) of us can produce Alpha waves when we close our eyes; it's even stronger when EEG is read from the occipital region of the brain. Therefore, this is exactly what I've done here. To make a sense of the Alpha measures, I related it to user's alertness; by saying higher Alpha indicates lower alert level because you're eyes are closed. This is just an assumption for the purpose of this demo, because user's alertness cannot be really defined by a single measures; it's more complicated than that.
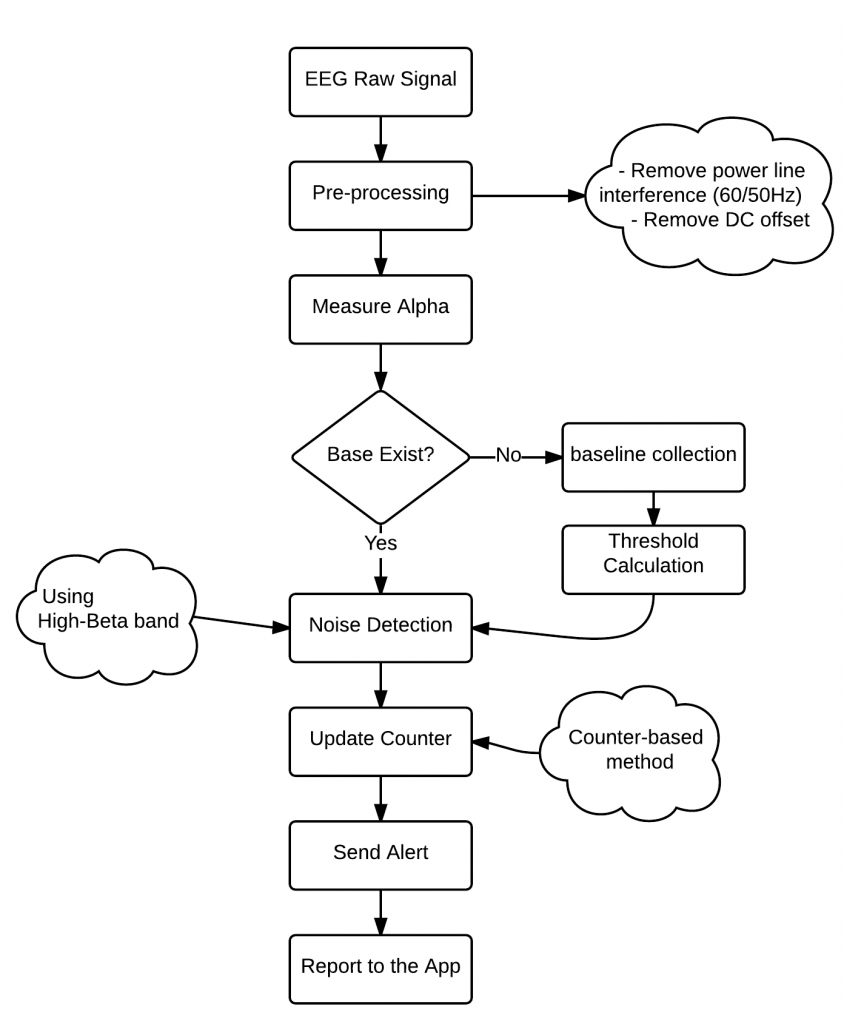
I like the approach done by the EEGHacker to detect Alpha Waves using OpenBCI 8-bit version. It's a straightforward approach to pre-process raw data, measure Alpha amplitude, and act on the data. I've followed a similar approach in pre-processing data, but I implemented a counter-based method to act on data. Also, I implemented a method to create a baseline in order to act on data properly for different users; since we don't produce the same amplitude of Alpha. The following flowchart diagram illustrate the algorithm flow:
The counter-based approach is implemented, which look into the Alpha amplitude if it's higher/lower than a specific threshold to increase/decrease the counter. Those thresholds are established in the baseline step, but the default setting is using a pre-determined thresholds. They worked for me & some of my friends too, but it might be different for other people; therefore, the algorithm can determine them if the baseline is enabled by setting "boolean UseStandardBase = false" in the code.
The following chart illustrate the counter-based approach:
For more details, please go through the source code. If you have any question, please post them here in the comment section.
Here I would like to go over the steps in general; assuming that the original firmware is already on the board, the board radio, and USB dongle:
- Upload the board code to your OpenBCI 32-bit by following this tutorial.
- Upload the radio code to the device radio by following this tutorial. Note that if you need to update the board code (step#1), you need to upload the original radio code in order for it to communicate with the dongle.
- Install mobile app using the source code. You can use Android Studio for Android-based devices & Xcode for iOS-based devices.
For this demo, I'm using only channel#1 & the location of the electrode is O1 according to the 10-20 system, which is the same location used by the Getting Started tutorial. But instead of a gel-based electrode, I'm using this reusable Dry EEG Electrode. To hold electrode in a place, I've attached it to a base-ball hat. Also, I'm using another dry electrode placed on T3 according to the 10-20 system and connected the SRB2 as a reference. Even though, I wasn't connecting my reference electrode to my earlobe, I was able to read a clear Alpha because the potential difference is noticeable enough. One last thing, I didn't use BIAS channel because it didn't make a big difference in my case of using a single channel.
This demo includes an app for Android-based devices and iOS-based devices. The functionality of reading the AlphaWave exists in both apps. However, the android version includes more functions; such as:
- Ability to send custom commands to the app.
- Plotting the alert level on real-time
- Summarize the results of each trial
Here is a video shows this demo in operation:
I hope you've enjoyed this demo.
- Upload iOS App to the App Store
- Work on the Android App
- Add enable baseline button to establish the correct thresholds

