Modelscope Hub | Paper | Demo
English | 中文
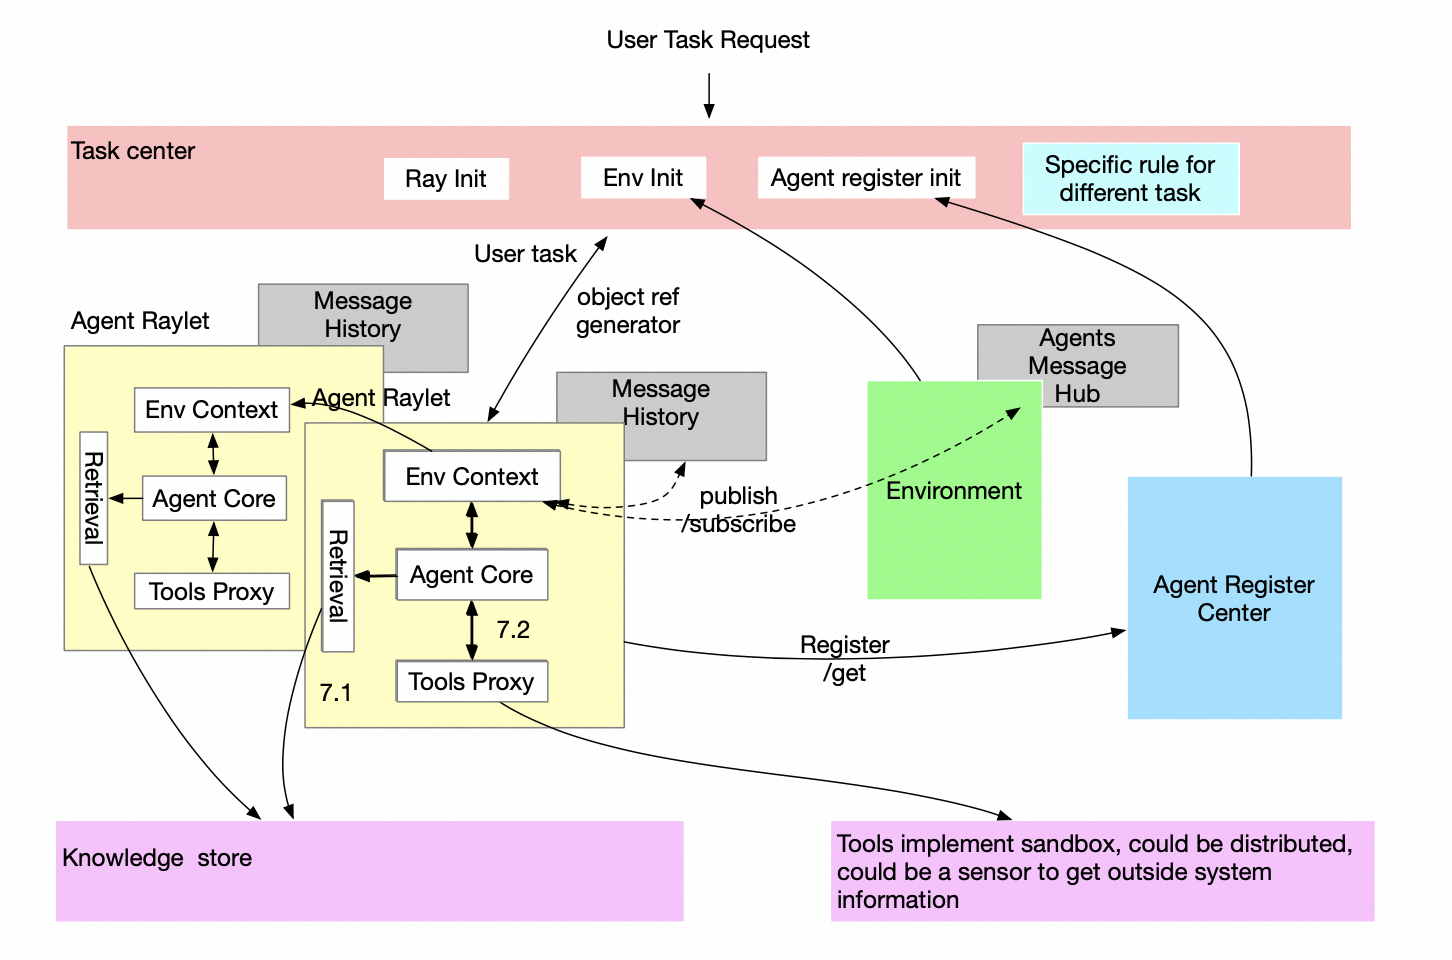
大型语言模型(LLM)智能体的应用已经变得非常普遍。 然而,单智能体系统(single-agent)在复杂的互动场景中,例如斯坦福小镇、软件公司、多方辩论等,经常会遇到困难。 因此,多智能体(multi-agent)架构被提出来解决这些限制,并且现在也已经有广泛的使用。 为了让ModelScope-Agent能够运行在multi-agent模式下,我们提出了以下multi-agent架构。
在我们的设计中,Ray在扮演着重要的角色。 通过Ray,我们可以通过只更新当前项目中的几行代码,就能轻松地将ModelScope-Agent扩展到分布式multi-agent系统, 并让我们的应用程序准备好进行并行处理,而无需关心服务通信、故障恢复、服务发现和资源调度。
为什么multi-agent框架需要这么复杂的能力呢?
当前的multi-agent框架主要关注于使用不同的single-agent来完成任务以获得更好的结果,许多论文已经证明multi-agent比single-agent获得了更好的结果。 然而,在现实中,许多任务应该由一群single-agent高效完成,例如一个数据爬虫任务可能需要数百个爬虫agent和数十个数据处理agent。 目前,在这个场景下的的multi-agent框架还很少,另外能够支持chatbot场景的multi-agent框架基本没有。 另一方面,ModelScope-Agent已经证明可以在生产环境中工作ModelScope Studio, 因此,我们相信将single-agent扩展到分布式multi-agent可能是multi-agent在生产环境中落地的一个趋势。
考虑到ModelScope-Agent的当前状态,希望不影响现有的工作,我们提出了以下设计解决方案:
-
将multi-agent的交互逻辑与single-agent的逻辑解耦:
- 使用**AgentEnvMixin**类基于Ray处理所有multi-agent通信逻辑,无需更改任何现有single-agent模块中的原始逻辑。
- 在**Environment**模块中管理环境信息,使用发布/订阅机制来推动agent之间的互动,而不会在执行层面阻塞agent。
- 消息中心维护在Environment模块中,同时每个各个agent也单独管理自己的历史记录。
-
引入agent注册中心Agent Registry Center概念:
- 用于维护系统中agent的信息并实现相关能力扩展。
- 用于更新agent状态。
-
引入任务中心Task Center概念:
- 设计的任务中心具有开放性,允许将消息订阅或发布给所有agent,支持agent之间各种形式的交互,如随机交流,或者通过用户定义的逻辑以循环方式进行推进。
- 允许通过使用
send_to和sent_from的方法直接交互方法,可快速开发流程简单的应用。 - 支持聊天机器人模式和终端模式,使用户可以在流媒体聊天gradio应用程序或终端上运行multi-agent。
基于有god角色的的多人聊天室gradio app
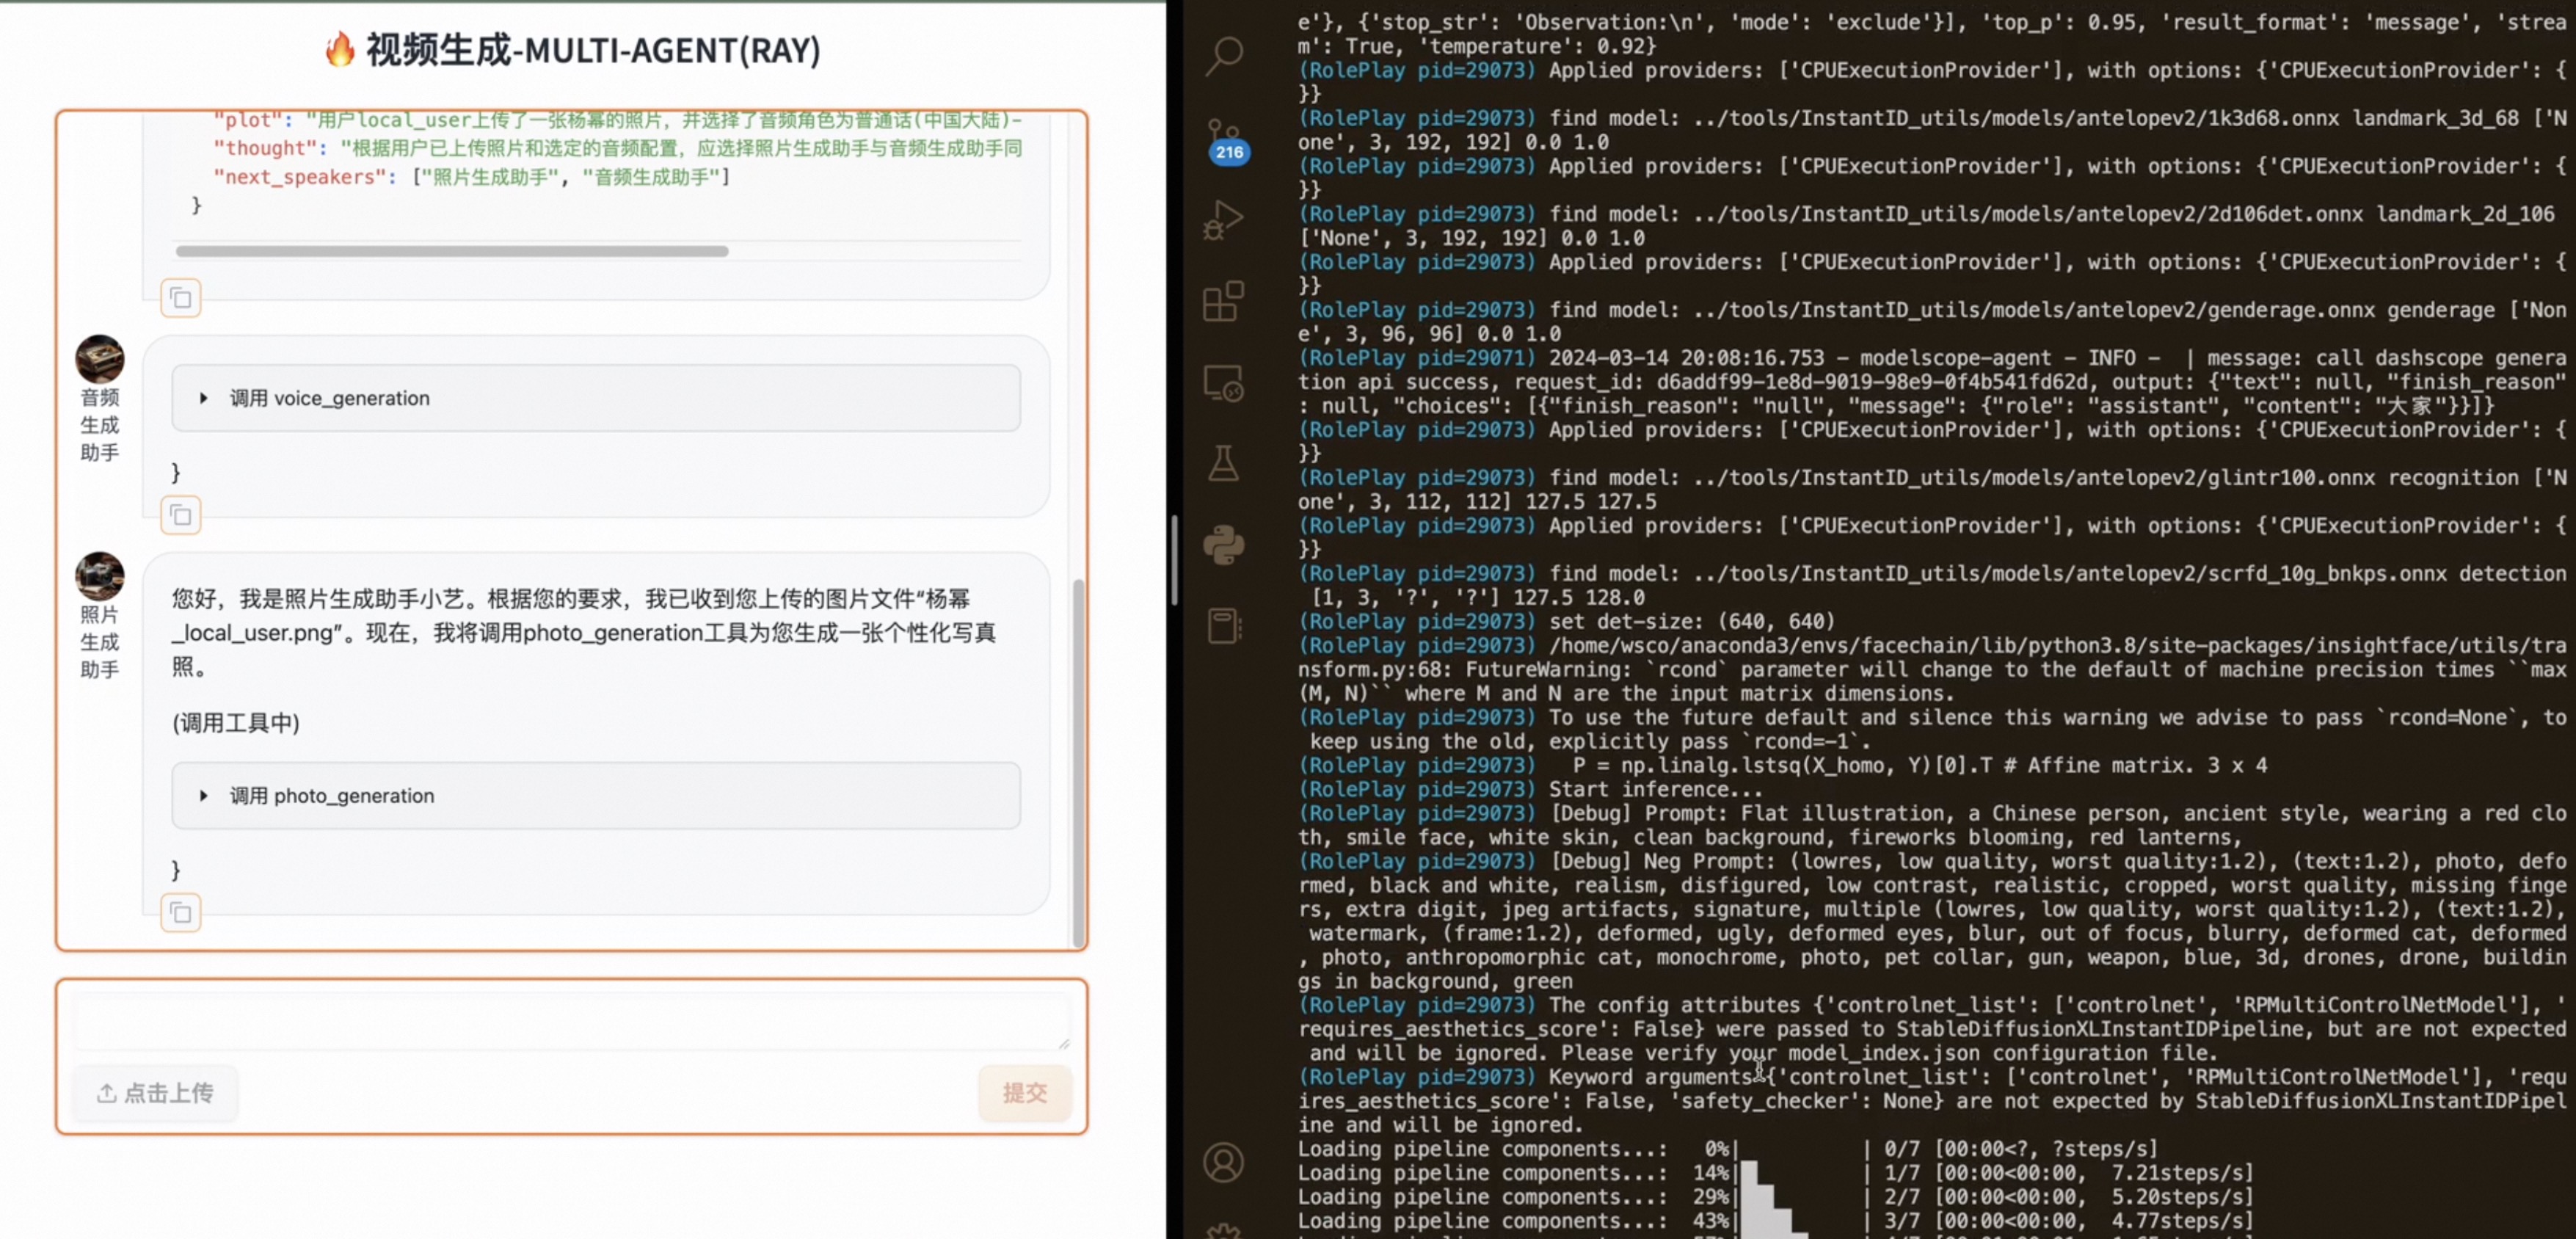
基于固定流程的视频生成gradio app.
本设计中Multi-Agent System主要以面向流程设计的方式在Ray上运行。 这样,用户不需要关心任何额外的分布式或多进程问题,ModelScope-Agent和Ray已经涵盖了这部分。 用户只需要根据任务类型编写过程脚本,以驱动代理之间的通信。
运行multi-agent分为两个阶段,初始化和处理,如下图所示。
在初始化阶段,Ray会通过同步操作将所有类转换为actor,例如:task_center、environment、agent_registry和agent。
任务中心(task_center)将使用 environment 和 agent_registry 两个组件来推进任务,并管理任务过程。
其中 remote=True 被用来允许Ray在此过程中扮演核心角色,用户不需要关心分布式或多进程的细节。
在运行任务之前,如果我们想在多进程中运行任务,必须先初始化Ray, 并将task_center转换为Ray上的 actor。
在task_center中,environment和agent_registry也会被自动转换为Ray上的 actor。
以下代码是task_center的初始化。请注意,使用ray.get()确保初始化操作是同步的。
import ray
from modelscope_agent import create_component
from modelscope_agent.task_center import TaskCenter
from modelscope_agent.multi_agents_utils.executors.ray import RayTaskExecutor

REMOTE_MODE = True

if REMOTE_MODE:
    RayTaskExecutor.init_ray()

task_center = create_component(
    TaskCenter,
    name='task_center',
remote=REMOTE_MODE)所有的agent将通过函数create_component进行初始化。
如果设置remote=True,将把agent转换为一个Ray上的actor,并将在一个独立的进程上运行.
如果remote=False,那么它就是一个简单的agent类,和普通的single agent没有区别。
入参name用于定义在Ray中对应的actor的名称;
另一方面,入参role用于在ModelScope-Agent中定义角色名称。
其余输入的定义与 single agent相同。
import os

from modelscope_agent import create_component
from modelscope_agent.agents import RolePlay

llm_config = {
    'model': 'qwen-max',
    'api_key': os.getenv('DASHSCOPE_API_KEY'),
    'model_server': 'dashscope'
}
function_list = []
role_play1 = create_component(
    RolePlay,
    name='role_play1',
    remote=True,
    llm=llm_config,
    function_list=function_list)

role_play2 = create_component(
    RolePlay,
    name='role_play2',
    remote=True,
    llm=llm_config,
function_list=function_list)这些agent随后将通过task_center的add_agents方法进行注册。
值得注意的是,当在上一步的初始化方法create_component()把一个类变成了ray的actor后,为了能够在ray集群中获得这个actor中某个method的信息,
我们需要在该method后面添加.remote()才能访问到,如下:
# register agents in remote = True mode
ray.get(task_center.add_agents.remote([role_play1, role_play2]))如果使用ray.get()去获取一个remote的method的结果,则说明这里是一个同步的过程。为了确保在后续的操作中,这一步的值已经完成操作。
如果想要不用ray,只用remote=False,则不需要使用ray.get(),我们可以把这段代码换成如下:
# register agents in remote = False mode
task_center.add_agents([role_play1, role_play2]))
值得注意的是,目前以上所有操作都是以同步方式进行的,以确保所有的actor都正确初始化。 不管remote mode状态如何
我们可以通过调用send_task_request来启动一个新的任务,并将任务发送到environment。
task = 'what is the best solution to land on moon?'
ray.get(task_center.send_task_request.remote(task))另外,我们也可以通过参数send_to传入agent的角色名称,以向特定的agent发送任务请求。
ray.get(task_center.send_task_request.remote(task, send_to=['role_play1']))对应的remote=False的情况,我们可以直接调用send_task_request方法,而不需要使用ray.get()。
task_center.send_task_request(task)以及
task_center.send_task_request(task, send_to=['role_play1'])然后,我们可以使用task_center的静态方法step来编写我们的multi-agent流程逻辑。
import ray
n_round = 10
while n_round > 0:

    for frame in task_center.step.remote():
        print(ray.get(frame))


n_round -= 1step方法需要被转换为Ray中的task函数,即step.remote,因此我们必须将其设置为静态方法,并将task_center作为输入传入,以便让这个step函数获得任务的信息。
在step任务方法内部,它将并行地调用对于那些在这一步骤中应该响应的agent的step方法。
返回的响应将是一个分布式生成器,在Ray中被称为object reference generator,它是Ray集群中的一个共享内存对象。
因此,我们必须调用ray.get(frame)来将这个对象提取为正常的生成器。
要详细了解ray,请参考Ray介绍文档。
在 remote=False 的情况下,我们可以直接调用step方法,而不需要使用ray.get()。
n_round = 10
while n_round > 0:

    for frame in task_center.step():
        print(frame)

    n_round -= 1
这里返回的是一个标准的python生成器,我们可以直接使用。
原始的ModelScope-Agent设计用于单个agent执行任务,并允许用户实例化多个agent并让它们相互通信。 在这种情况下,用户也可以使用原始的ModelScope-Agent让多个agent共同完成一个任务,但用户必须处理agent之间的通信以及任务的进展, 此外,agent必须在单个进程上运行。以下代码展示了如何运行两个代理在原始的ModelScope-Agent上讨论一个主题的场景。
from modelscope_agent.agents import RolePlay
from modelscope_agent.memory import Memory
from modelscope_agent.schemas import Message

role_template_joe = 'you are the president of the United States Joe Biden, and you are debating with former president Donald Trump with couple of topics'
role_template_trump = 'you are the former president of the United States Donald Trump, and you are debating with current president Joe Biden with couple of topics'
llm_config = {
    'model': 'qwen-max',
    'model_server': 'dashscope',
    }

# initialize the memory for each agent
joe_memory = Memory(path="/root/you_data/you_config/joe_biden.json")
trump_memory = Memory(path="/root/you_data/you_config/joe_biden.json")

# initialize the agents

joe_biden = RolePlay(llm=llm_config, instruction=role_template_joe)
trump = RolePlay(llm=llm_config, instruction=role_template_joe)

# start the task
task = 'what is the best solution to land on moon?'
round = 3

trump_response = ''
joe_response = ''

# assume joe always the first to response
for i in range(round):

    # joe round
    joe_history = joe_memory.get_history()
    trump_history = trump_memory.get_history()
    cur_joe_prompt = f'with topic {task},  in last round trump said, {trump_response}'
    joe_response_stream = joe_biden.run(cur_joe_prompt, history=joe_history)
    joe_response = ''
    for chunk in joe_response_stream:
       joe_response += chunk
    print(joe_response)
    joe_memory.update_history([
       Message(role='user', content=cur_joe_prompt),
       Message(role='assistant', content=joe_response),
    ])

    # trump round
    cur_trump_prompt = f'with topic {task}, in this round joe said, {joe_response}'
    trump_response_stream = trump.run(cur_trump_prompt, history=trump_history)
    trump_response = ''
    for chunk in trump_response_stream:
       trump_response += chunk
    print(trump_response)
    trump_memory.update_history([
       Message(role='user', content=cur_trump_prompt),
       Message(role='assistant', content=trump_response),
    ])
正如我们所看到的,用户必须负责处理agent之间的通信以及任务的推进,而这只是两个agent的场景。 如果我们有更多的agent,代码将会更加复杂。 使用multi-agent模式,用户只需关心任务的推进,agent之间的通信将由agent_registry、environment和task_center自动处理。
代码将像如下重复上述多agent交互的案例。
import os
from modelscope_agent import create_component
from modelscope_agent.agents import RolePlay
from modelscope_agent.task_center import TaskCenter

REMOTE_MODE = False

llm_config = {
    'model': 'qwen-max',
    'api_key': os.getenv('DASHSCOPE_API_KEY'),
    'model_server': 'dashscope'
}
function_list = []

task_center = create_component(
    TaskCenter, name='task_center', remote=REMOTE_MODE)

role_template_joe = 'you are the president of the United States Joe Biden, and you are debating with former president Donald Trump with couple of topics'
role_template_trump = 'you are the former president of the United States Donald Trump, and you are debating with current president Joe Biden with couple of topics'

joe_biden = create_component(
    RolePlay,
    name='joe_biden',
    remote=REMOTE_MODE,
    llm=llm_config,
    function_list=function_list,
    instruction=role_template_joe)

donald_trump = create_component(
    RolePlay,
    name='donald_trump',
    remote=REMOTE_MODE,
    llm=llm_config,
    function_list=function_list,
    instruction=role_template_trump)


task_center.add_agents([joe_biden, donald_trump])

n_round = 6 # 3 round for each agent
task = 'what is the best solution to land on moon?'
task_center.send_task_request(task, send_to='joe_biden')
while n_round > 0:

    for frame in task_center.step():
        print(frame)

n_round -= 1task_center.step()做了什么事,会在下面章节具体讲解。
从上述代码中,我们可以看到multi-agent模式比原始ModelScope-Agent的single agent模式更高效且更易于使用。
Task Center的使用
task_center是multi-agent的核心,它将管理任务进程和agent之间的通信。在task_center中提供了两个核心的API:
send_task_request:向environment发送一个任务,以开始一个新任务,或者用来自外部系统(用户输入)的额外信息继续任务step:推进任务进程,并让每个agent根据设置在此步骤中做出响应
send_task_request会将一个任务发送到环境中,通过输入参数send_to来指定哪个代理应该在这一步骤中做出响应,他的参数包括:
task: 任务或输入或信息send_to:可以是agent的名称的列表,或一个单独的agent名称,默认为all,表示让所有agent响应。send_from:可以用来指定发送此任务请求的代理,默认为user_requirement, 表示任务来自外部用户输入。
我们可以对上述例子做如下调整:
task_center.send_task_request(task, send_to='joe_biden')这意味着内容为task的消息只会发送给角色名称为joe_biden的agent, joe_biden将会在这一步骤中做出响应。
我们也可以指定send_from,以便让agent知道是谁发送了这个任务请求,如下
task_center.send_task_request('I dont agree with you about the landing project', send_to='joe_biden', send_from='donald_trump')step方法将使每个agent在这一步骤中作出响应,响应将是一个生成器,在ray中是一个分布式生成器。step方法中的输入包括:
task:当前步骤中的附加任务或输入或信息round:在某些情况下,任务是基于轮次的,需要传入轮次s数,大多数情况下,轮次数为1send_to:指定在这一步骤中生成的消息应发送给谁(默认发送给所有人)allowed_roles:指定在这一步骤中应响应的agent,如果未指定,则只有在上一步骤中收到消息的代理会在这一步骤中响应user_response:外部用户作为human在这一步骤中的响应,如果任务是聊天机器人模式,用户的响应将在此步骤中传入,以替换llm的输出,如果本步骤中有user-agent
有了以上的参数,step方法可以在不同场景的multi-agent中使用。 例如,在一个三人辩论场景中,step方法可以像这样使用:
# add new role
role_template_hillary = 'you are the former secretary of state Hillary Clinton, and you are debating with former president Donald Trump and current president Joe Biden with couple of topics'

hillary_clinton = create_component(
    RolePlay,
    name='hillary_clinton',
    remote=REMOTE_MODE,
    llm=llm_config,
    function_list=function_list,
    instruction=role_template_hillary)

# initialize the agents
task_center.add_agents([joe_biden, donald_trump, hillary_clinton])

# let joe_biden start the topic
task_center.send_task_request('what is the best solution to land on moon?', send_to='joe_biden')

# in 1st step, let joe_biden only send his opinion to hillary_clinton(considering as whisper), the message will print out
for frame in task_center.step(send_to='hillary_clinton'):
    print(frame)

# in 2nd step, allow only donald_trump to response the topic
for frame in task_center.step(allowed_roles='donald_trump'):
print(frame)请注意,在frame中只会显示来自不同agent的消息,并且格式为<[role_name]>: [message stream]。
用户需要根据自己的业务需求在step方法中处理future输出的格式。
上述案例展示了如何在multi-agent任务中使用step方法中的send_to和allowed_roles来控制agent之间的通信。 在另一个情况下,在聊天机器人模式中,如果本步骤中包含user-agent,可以使用user_response让用户在这一步骤中进行输入,以取代LLM(大型语言模型)的输出。 示例如下:
# initialize a new user
user = create_component(
    RolePlay,
    name='user',
    remote=REMOTE_MODE,
    llm=llm_config,
    function_list=function_list,
    instruction=role_template_joe,
    human_input_mode='ON'
)
# initialize the agents
task_center.add_agents([joe_biden, donald_trump, hillary_clinton, user])

# let joe_biden start the topic
task_center.send_task_request('what is the best solution to land on moon?', send_to='joe_biden')

# in 1st step, let joe_biden send his opinion to all agents.
for frame in task_center.step():
    print(frame)

# in 2nd step, allow only user to response the topic, with user_response
result = ''
for frame in task_center.step(allowed_roles='user', user_response='I dont agree with you about the landing project'):
   result += frame
   print(frame)

# the input from outside will not print out here as the user_response is set
assert result == ''可以看到,用户的响应将在这个步骤中被使用,以取代大型语言模型(LLM)的输出,因为名为user的agent 是一个user-agent。
当send_task_request() 被调用的时候,一条包含send_to和send_from的Message会被记录到 Environment 中。
具体的存储方式是,在环境中每一个role都会维护一个独立的队列,当 send_to 中包含某个role的时候,该条Message则会被存到对应role的消息队列中。
当step() 方法被调用的时候,首先会根据allower_roles判断谁在当前step需要处理信息,如果没有指定,则去获取role的消息队列中有还有消息待处理的role进行本轮的step.
这些还有待处理消息的role,接下来会进入到具体的消息执行环节,其中每一个role会有如下流程,多个role会去并行进行处理:
- 首先会调用
pull方法,把待处理的消息拿出来,准备处理。 - 将这些message处理成prompt,准备作为llm的输入
- 调用原始single agent的
run方法,进行生成反馈这些消息 - 根据当前轮是否有
send_to判断,将生成的结果publish到环境中对应的role,默认全体role都能收到,这一过程同上一步send_task_request()所做相同。
agent_env_util 的详细信息
agent_env_mixin是一个mixin类,用来处理代理之间的通信,以及从环境获取信息。
agent_env_mixin中的主要方法是step,它包含以下步骤:
- 调用
pull方法,从环境中提取发送给角色的消息 - 将消息转换为提示词(prompt), 用户可以自定义转换行为
- 将提示词发送到原始agent的
run方法 - 调用
publish,将响应消息发布到环境,消息中包含了哪些角色应该接收消息的信息。
environment详细信息
environment用来管理消息中心,它维护了以下信息:
*在队列中存储发送给每个agent的消息,并且这些消息会在下一个步骤中从队列中弹出,并被每个agent拉取。 *在列表中存储来自所有agent的消息的完整历史,观察者(watcher)角色将被允许读取消息的完整历史记录。 *在列表中存储user_requirement,user_requirement是来自外部系统的任务或输入,所有用户都将被允许读取这些消息,但只有任务中心(task_center)能够写入。
agents_registry详细信息
agent_registry用来管理所有agent信息,它维护以下信息:
- 在系统中注册agent,并更新agent状态
- 允许任务中心获取agent信息,以及通过role name获取agent等查询功能
上述这些组件一起工作,构成了多代理系统中的消息传递和任务管理框架。通过这样的结构化方式,可以在多个代理之间有效地分配任务、同步通信,并跟踪整个系统的状态变化。
到目前为止,我们创建了一个包含两个agent的multi-agent system,并让它们讨论一个关于 登月的最佳解决方案是什么 的话题。
同时,值得注意的是,随着agent数量的增加,这个基于Ray的multi-agent system的效率将会显现出来, 数量增大能发挥出来Ray的特性。
目前我们实现了一个非常简单的任务,我们希望开发者能够探索更多具有更复杂条件的任务,我们也会持续的进行探索。
尽管我们设计了这样的multi-agent框架,但要将其投入生产环境还有许多挑战。以下问题是已知问题:
- 在单机多进程任务中,Ray在这种场景中不占优势,并且在初始化和多进程通信上有一些额外开销,影响速度。
- Ray在fork进程方面还有许多问题,例如使用Gradio 启动任务的时候会有ray的子进程退出问题。
- 用户必须为不同的任务编写代码,即使对于基于规则的逻辑,也没有万能的解决方案来避免写代码。
- 对于那些只在单进程上编码的人来说,很难调试,通过日志追踪问题应该会更好。
除了上述问题之外,为了使multi-agent适应更复杂的任务,还需要添加更多功能,包括:
- 适配如上文中提到的数据爬虫任务等更复杂的任务场景。
- 为不同任务提供更好的指令和提示。
- 分布式memory管理。
- 分布式tool服务调用。
- TBD


