In this doc, we will introduce how to package and publish your own nuget package. Note that this will include the packaging and release of the two packages.
Rename the following files/directories, where PACKAGE_NAME is the package name you expect.
Note that this name should be unique, otherwise it will be rejected. You can search at nuget.org to confirm whether the name is unique.
./src/Apache.IoTDB=>./src/PACKAGE_NAME./src/Apache.IoTDB/Apache.IoTDB.csproj=>./src/PACKAGE_NAME/PACKAGE_NAME.csproj./src/Apache.IoTDB.Rpc.Generated=>./src/PACKAGE_NAME.Rpc.Generated./src/Apache.IoTDB.Rpc.Generated/Apache.IoTDB.Rpc.Generated.csproj=>./src/PACKAGE_NAME.Rpc.Generated/PACKAGE_NAME.Rpc.Generated.csproj
Besides, you also need to modify the configuration in ./src/Apache.IoTDB/Apache.IoTDB.csproj to ensure that the project references are correct.
<ProjectReference Include="..\Apache.IoTDB.Rpc.Generated\Apache.IoTDB.Rpc.Generated.csproj" />to
<ProjectReference Include="..\PACKAGE_NAME.Rpc.Generated\PACKAGE_NAME.Rpc.Generated.csproj" />Modify PACKAGE_NAME.csproj to add package information, including version number, author, company, package description information, etc.
The commonly used ones are as follows, you can find a complete list in NuGet pack and restore as MSBuild targets.
Version, a specific version number in the form Major.Minor.Patch[-Suffix] where -Suffix identifies pre-release versions. If not specified, the default value is 1.0.0.Authors, author and owner information. If not specified, the default value is AssemblyName.Company, your company name. If not specified, the default value is AssemblyName.PackageDescription, A long description of the package for UI display.
<PropertyGroup>
  <Version>0.12.4</Version>
  <Authors>Alice, Bob, Carol</Authors>
  <Company>Test Inc.</Company>
  <PackageDescription>A test nuget package.</PackageDescription>
</PropertyGroup>Execute the following commands in the same directory of PACKAGE_NAME.csproj and PACKAGE_NAME.Rpc.Generated.csproj to pack. You can find the generated package file PACKAGE_NAME.VERSION.nupkg in bin/.
dotnet pack PACKAGE_NAME.csproj --configuration debug dotnet pack PACKAGE_NAME.csproj --configuration release -
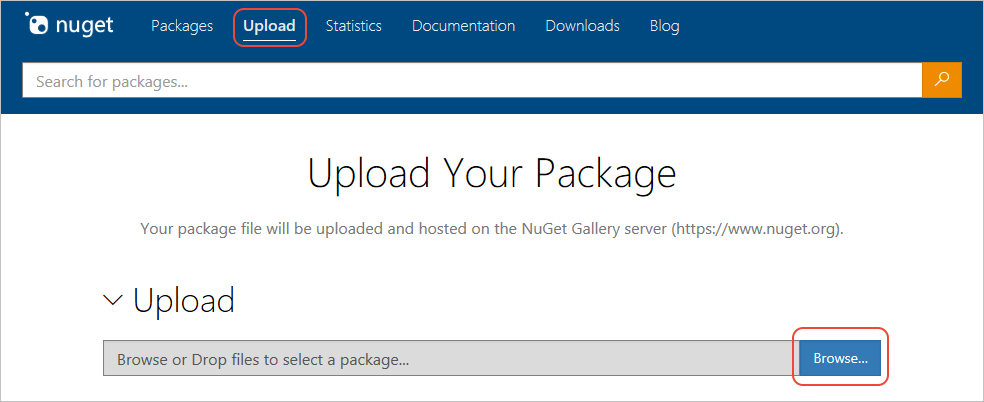
Select Upload on the top menu of nuget.org and browse to the package location.
-
nuget.org tells you if the package name is available. If it isn't, change the package identifier in your project, rebuild, and try the upload again.
-
If the package name is available, nuget.org opens a Verify section in which you can review the metadata from the package manifest. To change any of the metadata, edit your project (project file or
.nuspecfile), rebuild, recreate the package, and upload again. -
When all the information is ready, select the Submit button.
-
Sign into your nuget.org account or create an account if you don't have one already.
-
Select your user name (on the upper right), then select API Keys.
-
Select Create, provide a name for your key, select Select Scopes > Push. Enter * for Glob pattern, then select Create. (See below for more about scopes.)
-
Once the key is created, select Copy to retrieve the access key you need in the CLI:
-
Important: Save your key in a secure location because you cannot copy the key again later on. If you return to the API key page, you need to regenerate the key to copy it. You can also remove the API key if you no longer want to push packages via the CLI.
- Change to the directory containing the
.nupkgfile (bin/Debug/orbin/Release/). - Execute the following command, specifying your package name and replacing the key value with your API key:
dotnet nuget push PACKAGE_NAME.VERSION.nupkg --api-key YOUR_API_KEY --source https://api.nuget.org/v3/index.json

